
Svelte从入门到精通——流程
发表于 阅读时长26分钟
目录
本章笔者将演示Svelte从编译到运行的整体流程。
这里笔者使用的Node版本为18.15.0。
首先我们下载源码,然后把版本分支切换到4.2.12分支。
git clone git@github.com:sveltejs/svelte.git
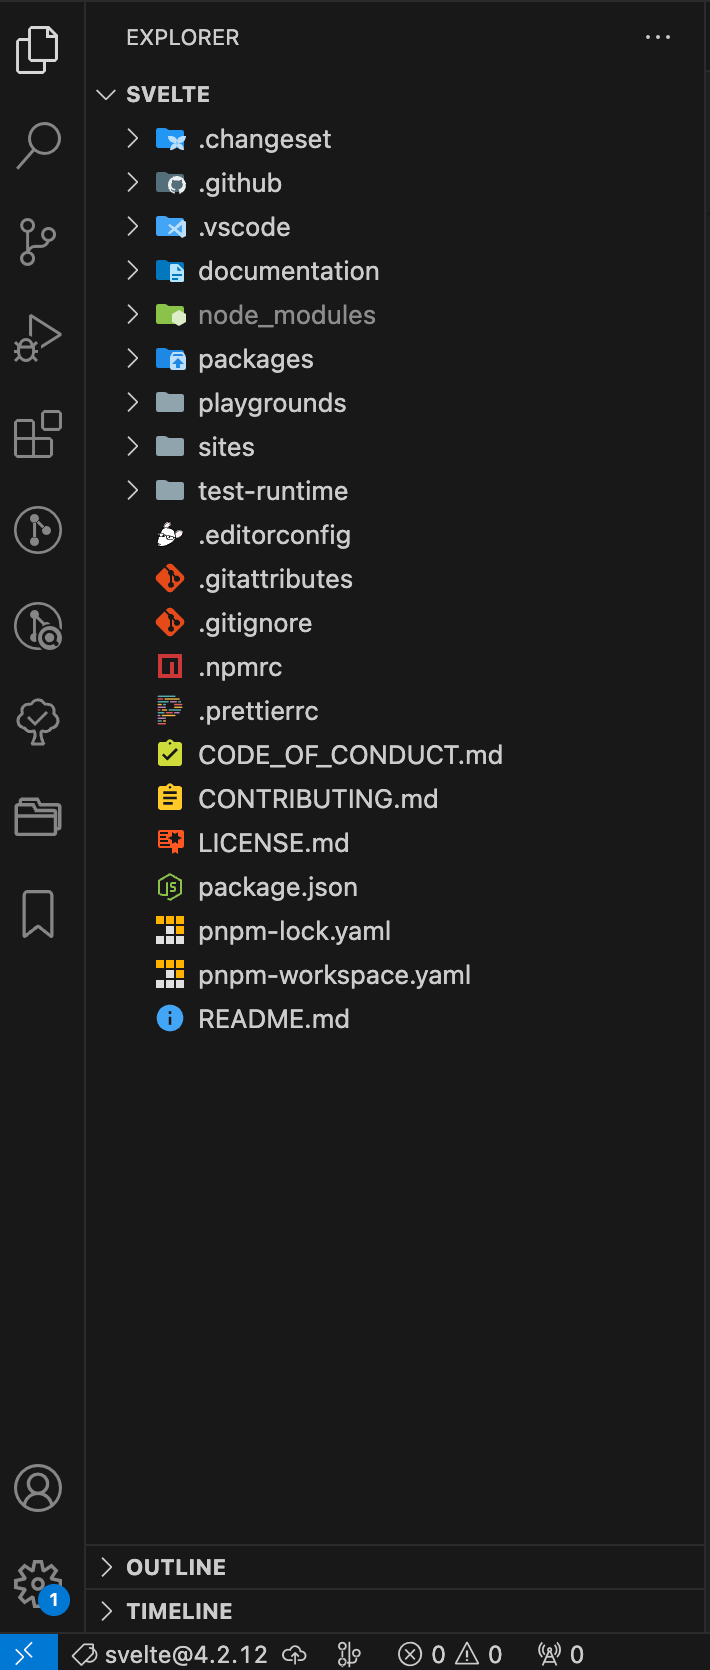
Svelte使用的是monorepo的管理方式,首先我们参考README.md的建议安装依赖:
pnpm install
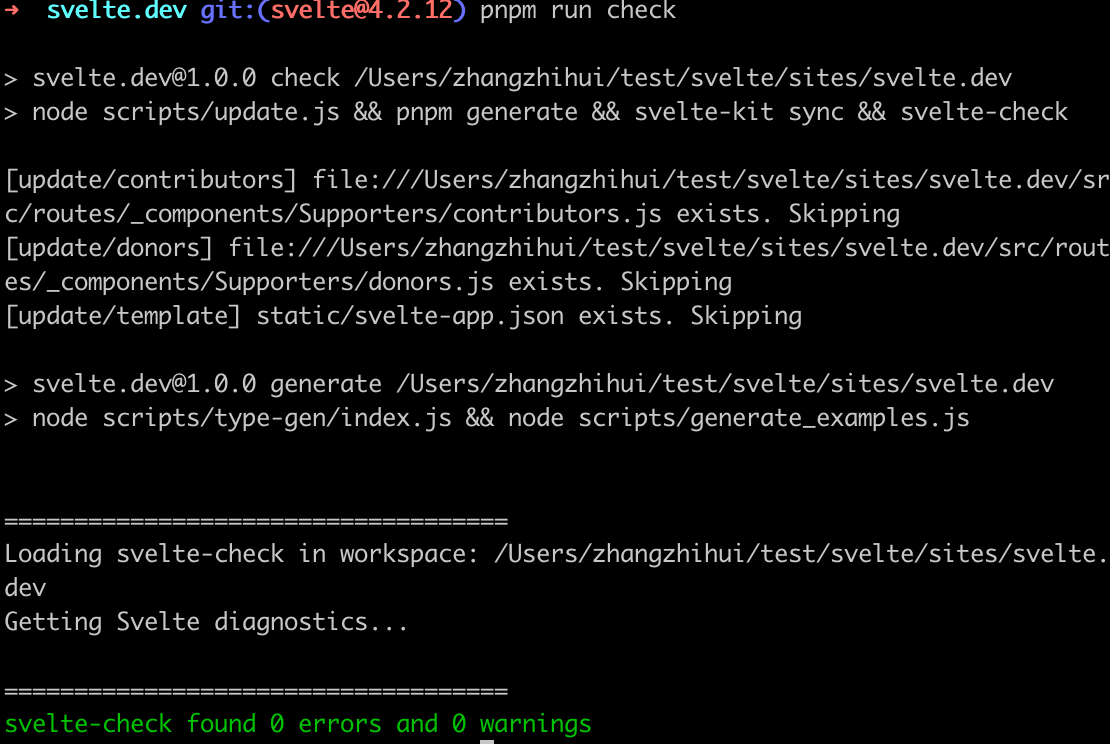
然后我们进入到sites/svelte.dev目录,执行pnpm run dev。
大概率会遇到这个问题:
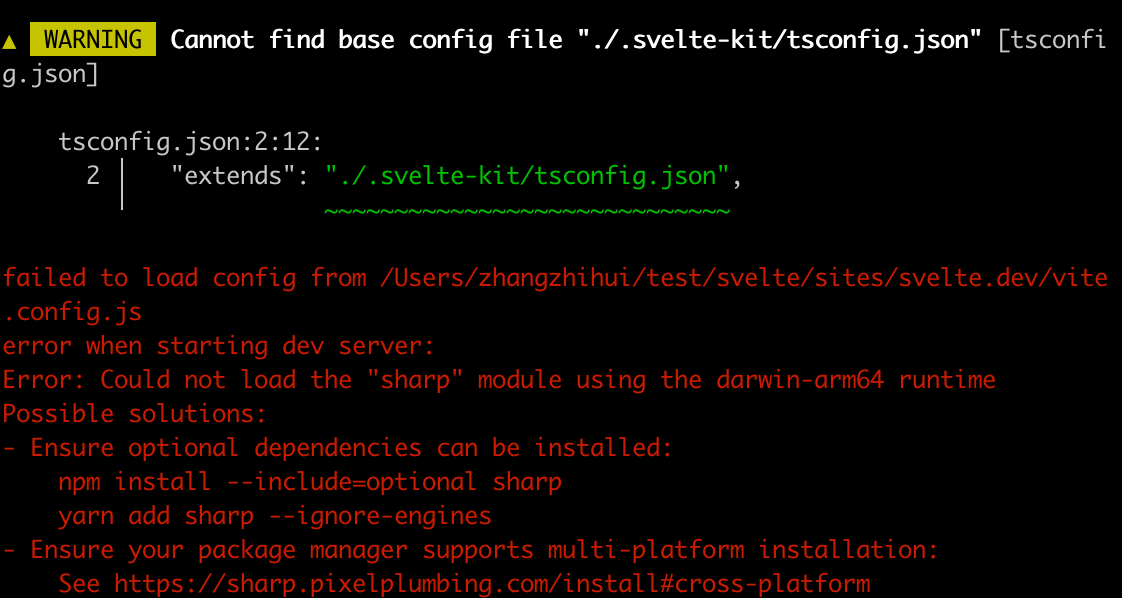
缺少sharp,我们按照提示安装:
pnpm add --force @img/sharp-darwin-arm64
重新运行,遇到一个warning:
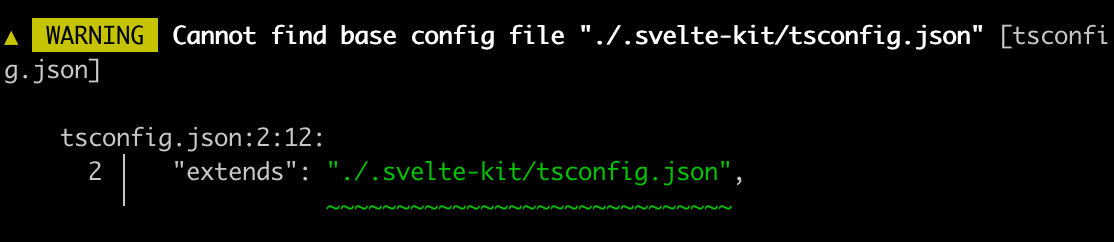
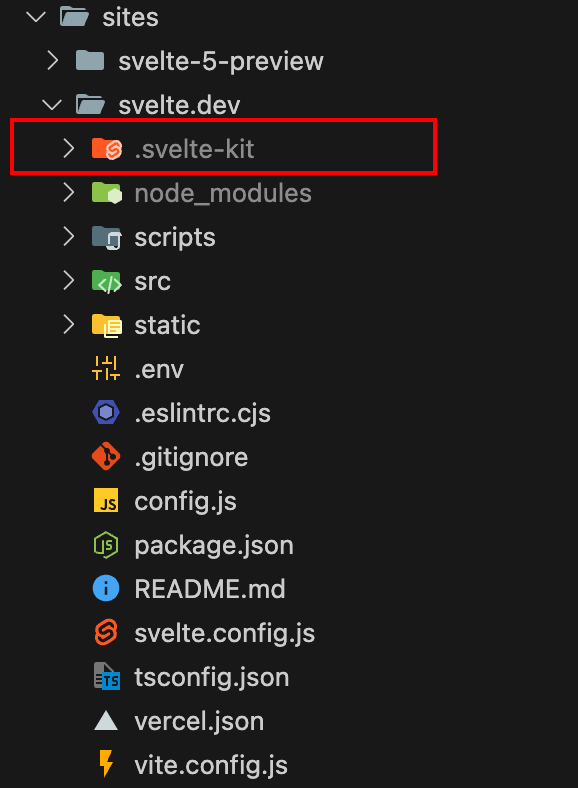
这是因为svelte.dev下缺少了一个.svelte-kit目录。
我们可以执行pnpm run check:
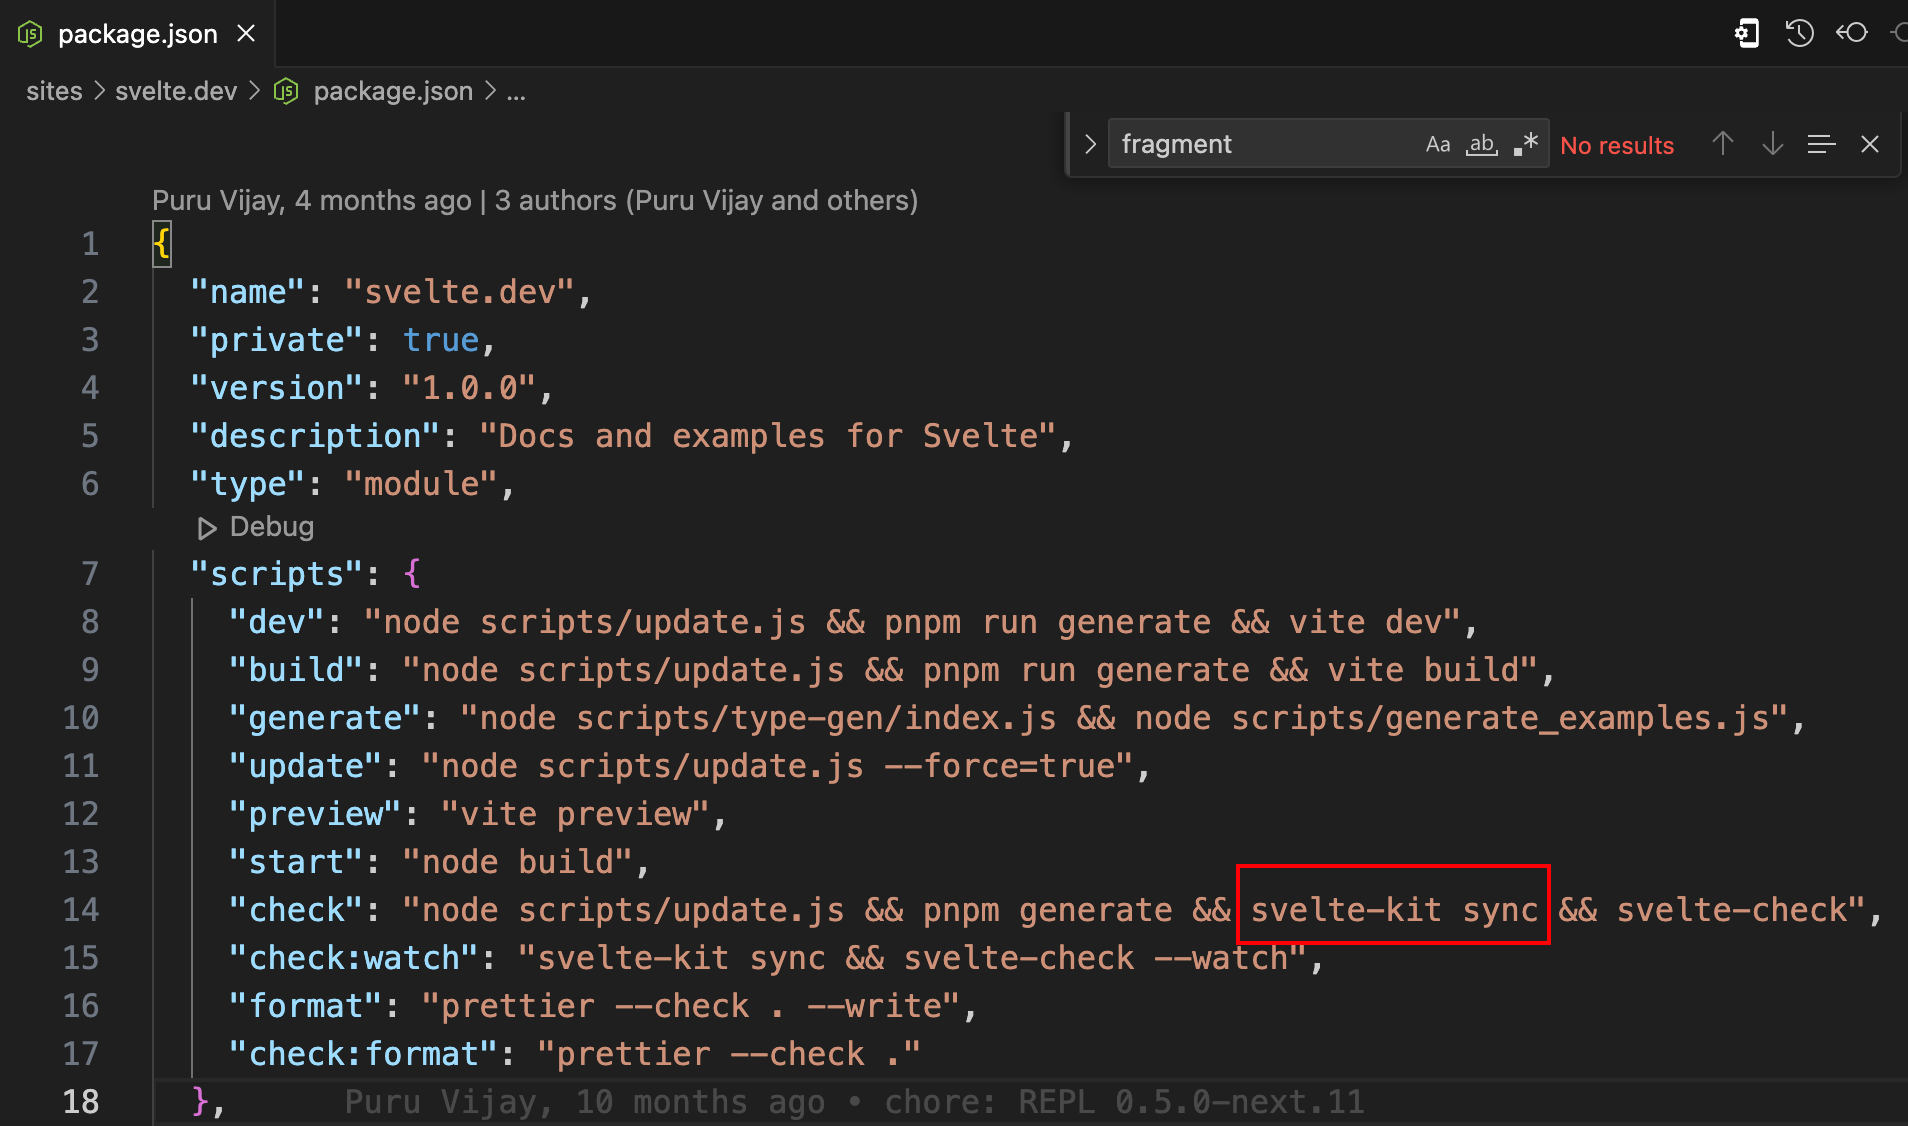
里面的svelte-kit sync帮助我们同步下载这个目录。
现在我们看到svelte.dev下已经有了.svelte-kit目录。
我们重新运行下pnpm run dev,正常情况能运行起来。
请读者朋友们结合本章内容和源码对比阅读,效果更佳。
compile阶段
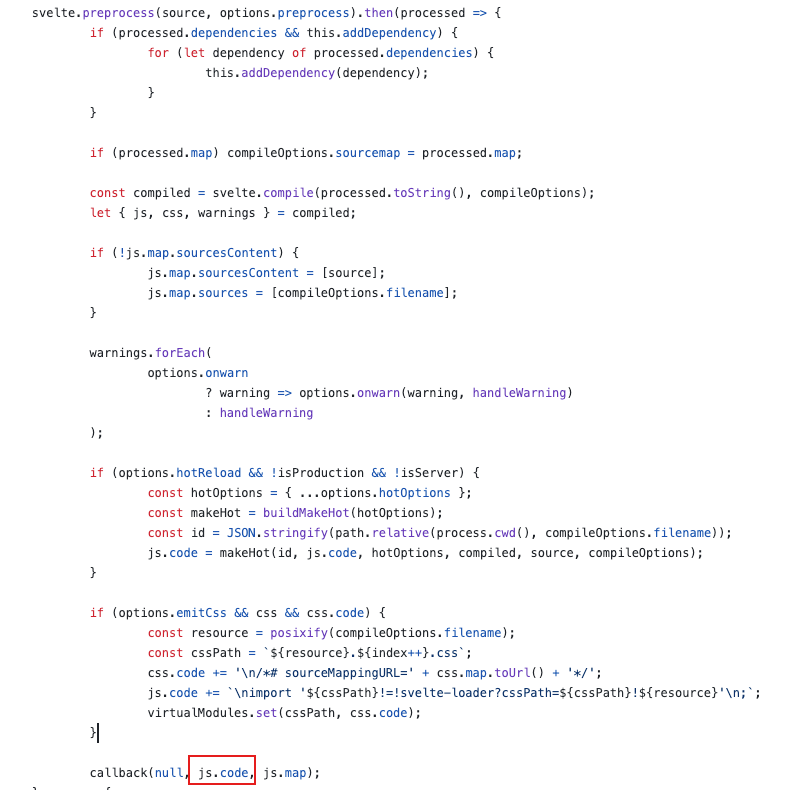
参照svelte-loader中的逻辑:
svelte.preprocess(source, options.preprocess).then(processed => {
  if (processed.dependencies && this.addDependency) {
    for (let dependency of processed.dependencies) {
      this.addDependency(dependency);
    }
  }

  if (processed.map) compileOptions.sourcemap = processed.map;

  const compiled = svelte.compile(processed.toString(), compileOptions);
  let { js, css, warnings } = compiled;

  callback(null, js.code, js.map);
})
首先Svelte文件经过预处理,比如像要添加typescript支持等,然后调用compile,最后返回js.code。
为了简单直观地查看到各个阶段的执行结果,我们在网站首页sites/svelte.dev/src/routes/+layout.svelte直接引入svelte编译器文件:
  import '@sveltejs/site-kit/styles/index.css';

  import { browser } from '$app/environment';
  import { page } from '$app/stores';
  import { Icon, Shell, Banners } from '@sveltejs/site-kit/components';
  import { Nav, Separator } from '@sveltejs/site-kit/nav';
  import { Search, SearchBox } from '@sveltejs/site-kit/search';
+ import { compile, preprocess } from '../../../../packages/svelte/src/compiler';
然后我们仿照svelte-loader的逻辑,先调用preprocess,然后把预处理的结果打印出来,因为我们本次重点在编译和运行,所以我们只是打印经过preprocess后的结果,在compile阶段,我们直接传入Svelte文件的字符串内容。
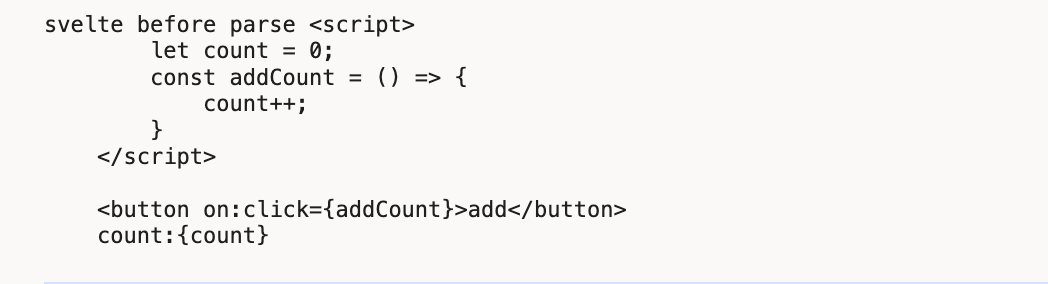
let str = `<script>
  let count = 0;
  const addCount = () => {
    count++;
  }
<\/script>

<button on:click={addCount}>add</button>
count:{count}
`;
preprocess(str, {}).then(preResult => {
  console.log('preprocess result', preResult);
  let result = compile(str);
  console.log('compile result', result);
});
进入到网站目录cd sites/svelte.dev,执行pnpm run dev把网站跑起来,在控制台中查看打印结果:

parse
compile(str)的内部逻辑首先是parse,地址:packages/svelte/src/compiler/compile/index.js。
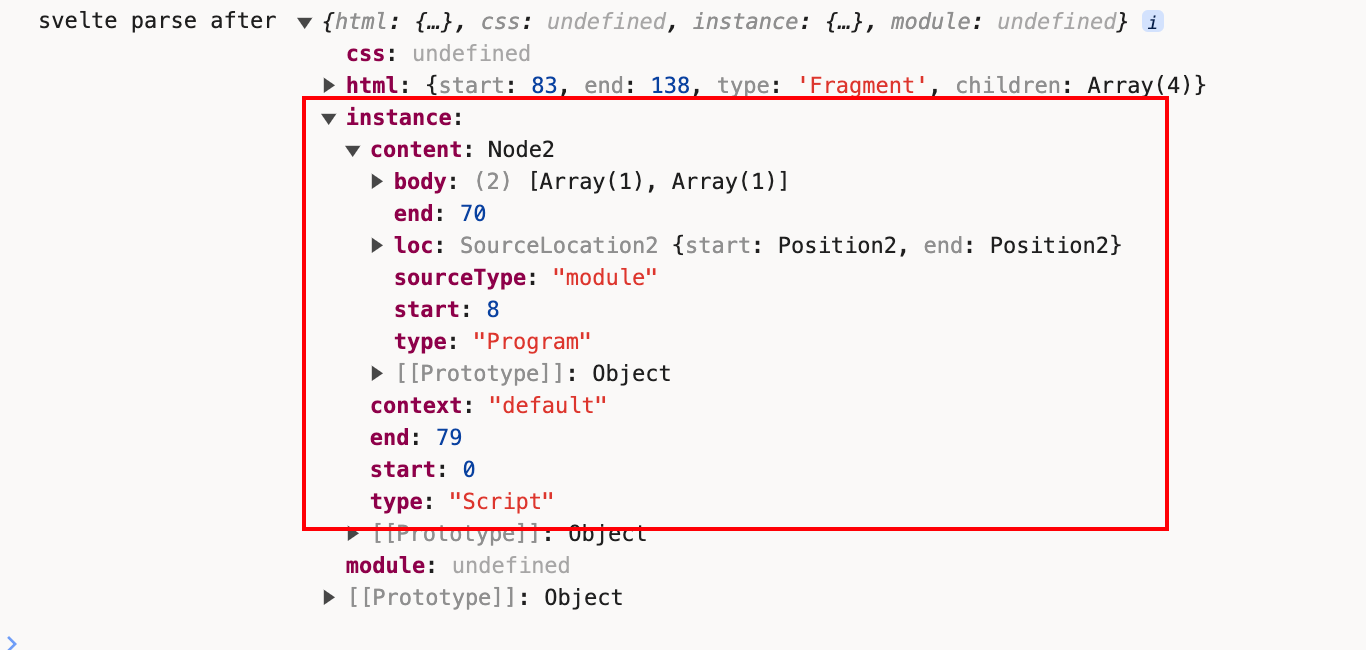
  console.log('svelte before parse', source);
  const ast = parse(source, options);
  console.log('svelte after parse', ast);
source即是我们的模板字符串,即Svelte文件的内容。
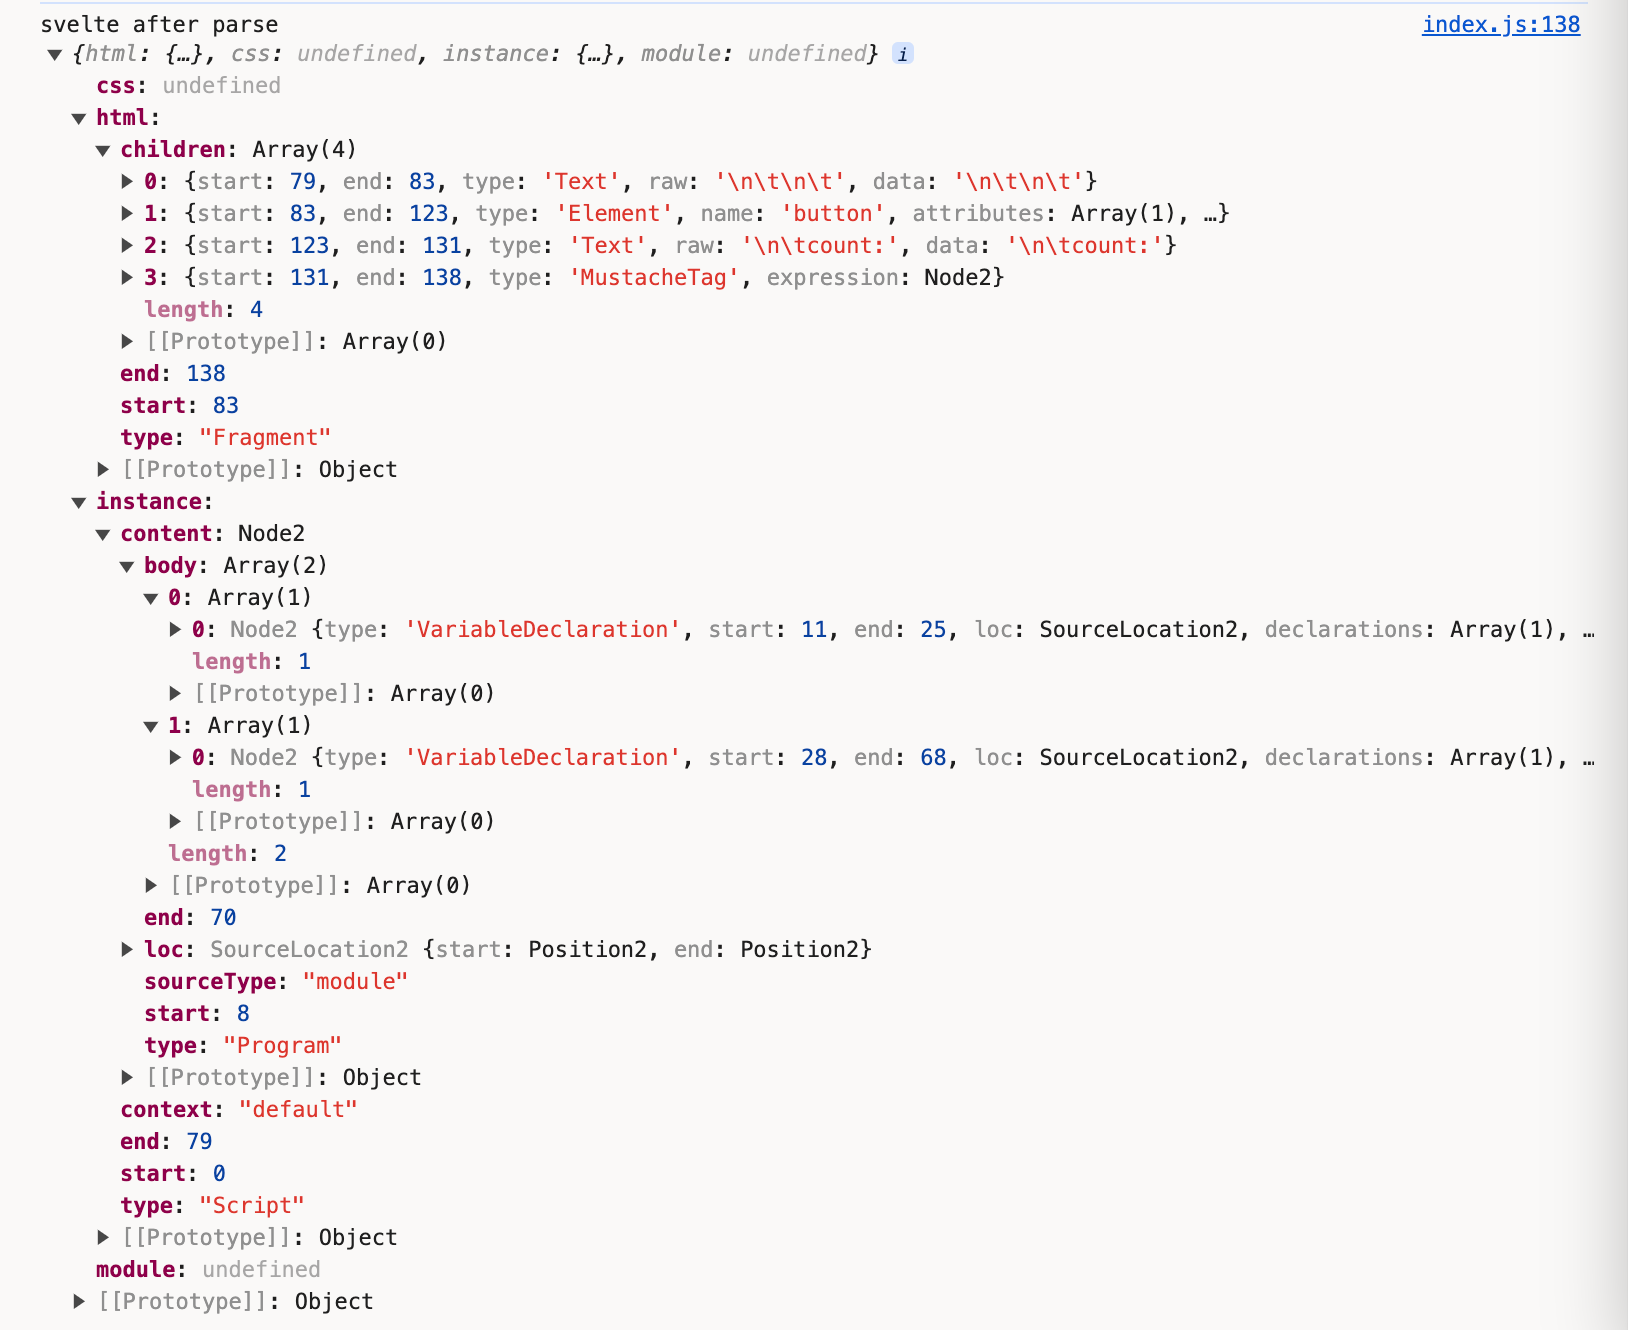
经过转换后得到ast对象
ast = {
  css: {}
  html: {},
  instance: {},
  module: {}
}
点击parse,进入到packages/svelte/src/compiler/parse/index.js。
parse内部有个Parser类,通过实例化该类,对模板字符串文件进行解析。
const parser = new Parser(template, options);
Parser内部则通过四种不同的类型的节点解析器,分别是fragment、tag、mustache和text。通过遍历文件的字符串内容,轮流调用这几个方法。
首先,我们没有使用<style></style>标签,忽略css解析的步骤。
在初始化时,默认的html内容整体的type是Fragment。把解析后的html数据存储到this.html中
this.html = {
  start: null,
  end: null,
  type: 'Fragment',
  children: []
};
开始解析我们的Svelte文件内容,最开始解析<script>...的最左侧<,符合tag的解析。
if (parser.match('<')) {
  return tag;
}
点击tag,进入packages/svelte/src/compiler/parse/state/tag.js。很明显,script符合以下逻辑:
const specials = new Map([
  [
    'script',
    {
      read: read_script,
      property: 'js'
    }
  ],
  [
    'style',
    {
      read: read_style,
      property: 'css'
    }
  ]
]);
调用read_script:
export default function read_script(parser, start, attributes) {
  ...
  let ast;
  try {
    ast = acorn.parse(source);
  } catch (err) {
    parser.acorn_error(err);
  }
  ...
  return {
    type: 'Script',
    start,
    end: parser.index,
    context: get_context(parser, attributes, start),
    content: ast
  };
}
点击acorn.parse,我们看到里面的核心便是调用code-read的parse来解析js的内容:
export const parse = (source) =>
  code_red.parse(source, {
    sourceType: 'module',
    ecmaVersion: 13,
    locations: true
  });
这部分便是ast对象中的instance属性中的内容:
到这里我们已经完成了对<script>...</script>标签内容的解析
接下来是重点处理的html的内容。
<script></script>解析完成之后,我们遇到了一个空行,空字符串也不能忽略,继续用fragment方法判断。
export default function fragment(parser) {
  ...

  return text;
}
使用text方法来解析这个空行内容。返回的格式:
export default function text(parser) {
  ...

  const node = {
    start,
    end: parser.index,
    type: 'Text',
    raw: data,
    data: decode_character_references(data, false)
  };

  parser.current().children.push(node);
}
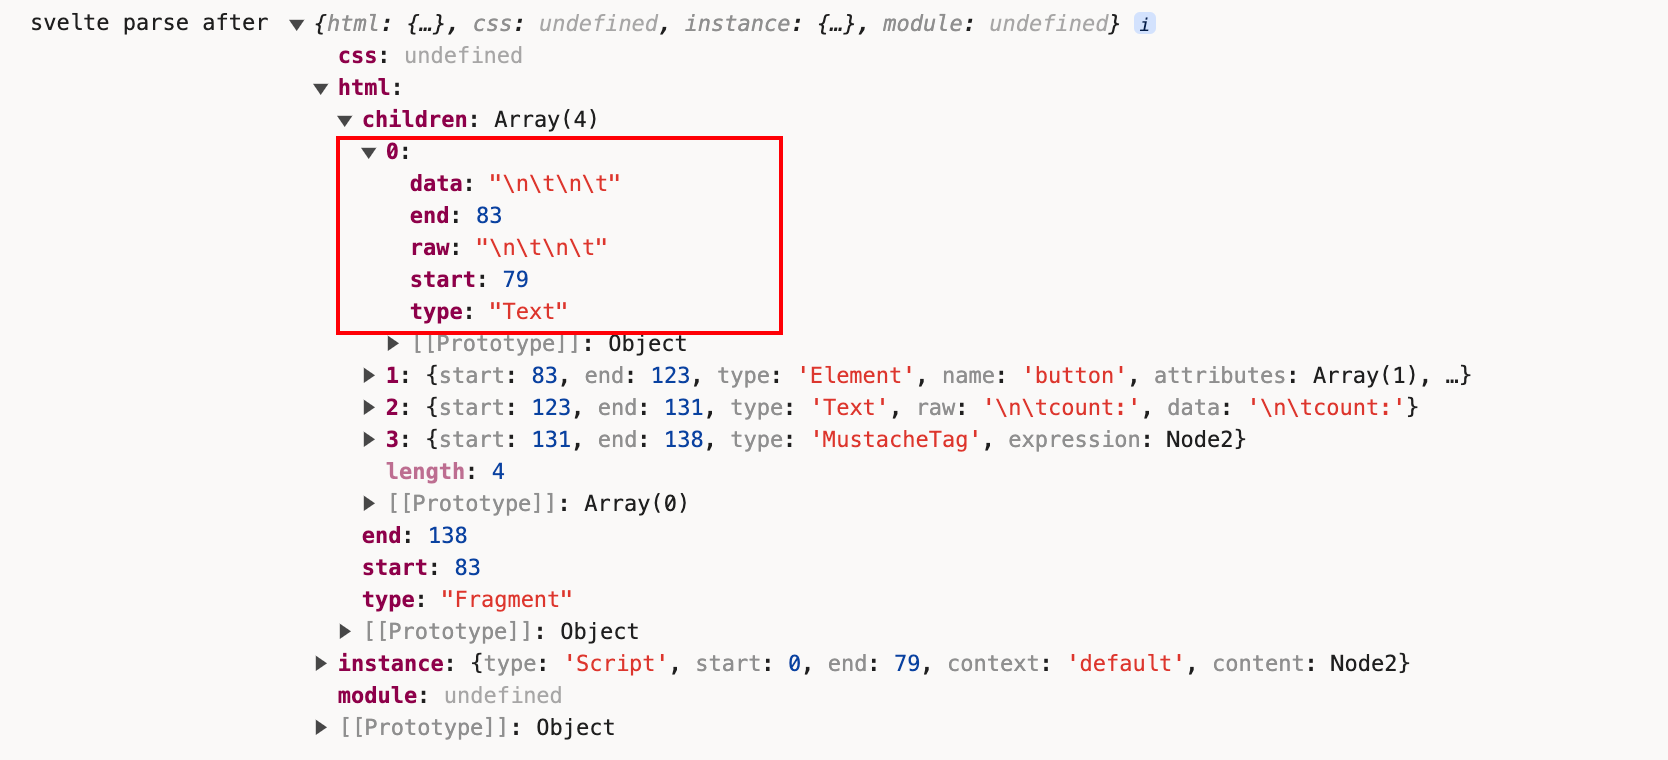
空行解析完成,我们遇到了<button>标签,此时仍旧是调用fragment中的tag方法。
const type = meta_tags.has(name)
    ? meta_tags.get(name)
    : regex_capital_letter.test(name[0]) || name === 'svelte:self' || name === 'svelte:component'
    ? 'InlineComponent'
    : name === 'svelte:fragment'
    ? 'SlotTemplate'
    : name === 'title' && parent_is_head(parser.stack)
    ? 'Title'
    : name === 'slot'
    ? 'Slot'
    : 'Element';

const element = {
  start,
  end: null,
  type,
  name,
  attributes: [],
  children: []
};
我们遇到的不是<script>、<style>此类标签,也不是Svelte的自定义标签,最后得到的是Elementtype。
之后开始读取标签内属性的内容:
while ((attribute = read_attribute(parser, unique_names, is_top_level_script_or_style))) {
  element.attributes.push(attribute);
  parser.allow_whitespace();
}
const name = parser.read_until(regex_token_ending_character);
if (!name) return null;
let end = parser.index;
parser.allow_whitespace();
const colon_index = name.indexOf(':');
const type = colon_index !== -1 && get_directive_type(name.slice(0, colon_index));
parser.read_until读取到on:click:
function get_directive_type(name) {
  if (name === 'use') return 'Action';
  if (name === 'animate') return 'Animation';
  if (name === 'bind') return 'Binding';
  if (name === 'class') return 'Class';
  if (name === 'style') return 'StyleDirective';
  if (name === 'on') return 'EventHandler';
  if (name === 'let') return 'Let';
  if (name === 'in' || name === 'out' || name === 'transition') return 'Transition';
}
通过get_directive_type来得到attribute的type是EventHandler类型。
通过read_attribute_value来获取on:click={}中{}内的值。
if (parser.eat('=')) {
  parser.allow_whitespace();
  value = read_attribute_value(parser, is_static);
  end = parser.index;
}
在read_attribute_value内部调用read_sequence:
try {
  value = read_sequence(
    parser,
    () => {
      // handle common case of quote marks existing outside of regex for performance reasons
      if (quote_mark) return parser.match(quote_mark);
      return !!parser.match_regex(regex_starts_with_invalid_attr_value);
    },
    'in attribute value'
  );
}
而read_sequence内部则调用read_expression(parser);,深挖其核心逻辑,最终是调用code-red的parseExpressionAt来解析{}的内容,将这部分内容赋值到expression属性中。
import * as code_red from 'code-red';

export const parse_expression_at = (source, index) =>
code_red.parseExpressionAt(source, index, {
  sourceType: 'module',
  ecmaVersion: 13,
  locations: true
});
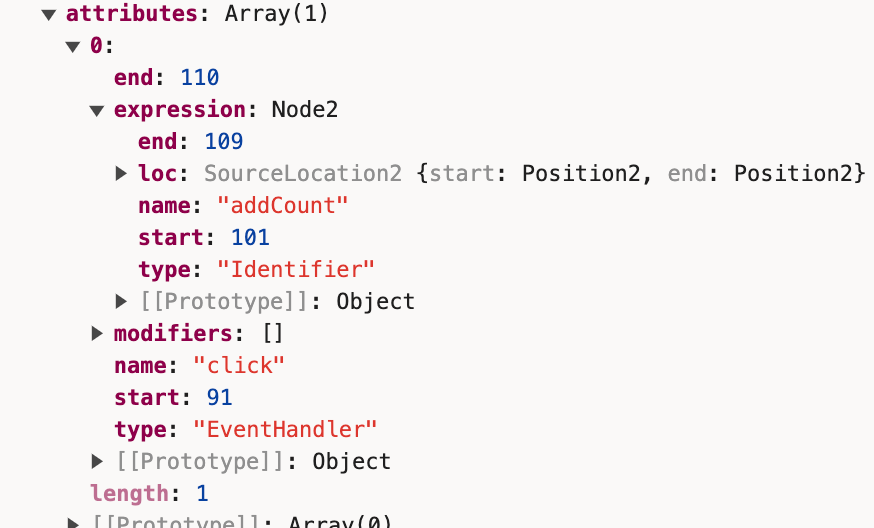
此时我们已经解析到<button on:click={addCount}>。
接着往下,这个Elementtype的children值只有一个节点,那就是add文案所代表的Text节点
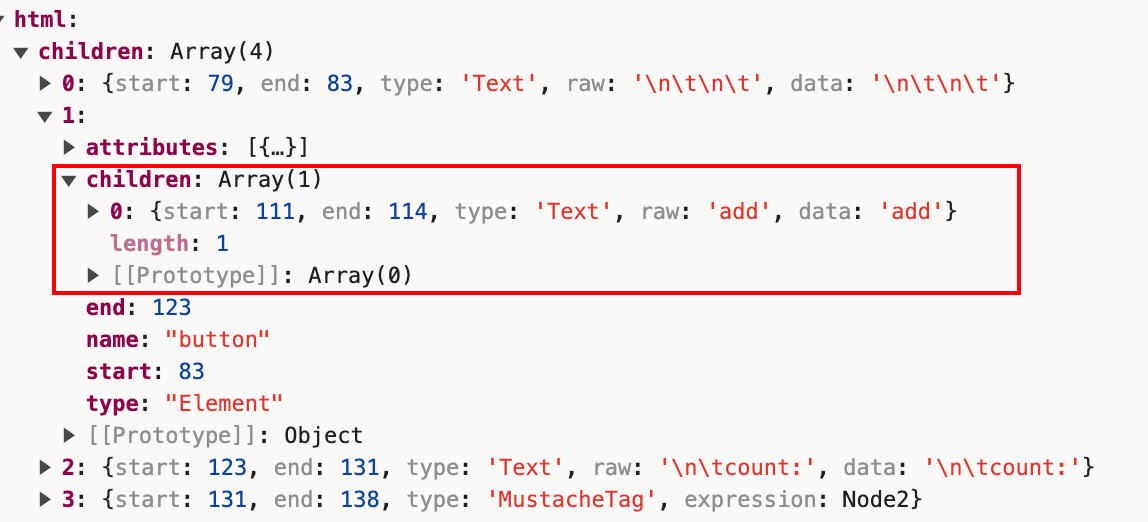
之后我们算是已经解析到</button>。
接着往下我们遇到count:,同样是Text节点。
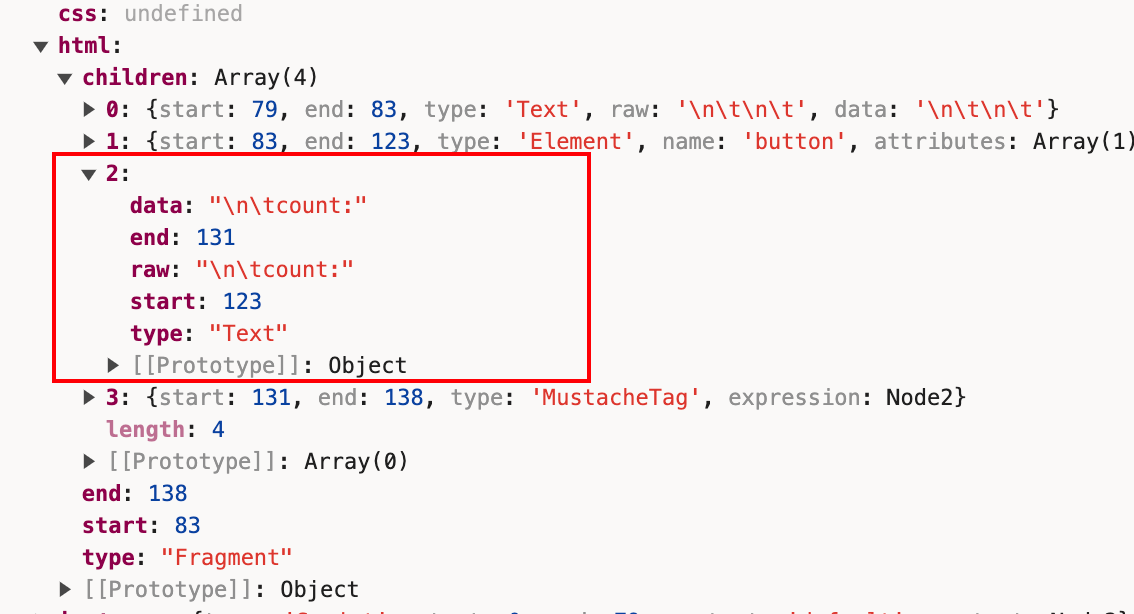
接着遇到{,继续调用fragment内的mustache方法,解析得到MustacheTag类型的节点。
const expression = read_expression(parser);
parser.allow_whitespace();
parser.eat('}', true);
parser.current().children.push({
  start,
  end: parser.index,
  type: 'MustacheTag',
  expression
});

Component
执行完const ast = parse(source, options);后,我们进入下一步:
const component = new Component(
  ast,
  source,
  options.name || get_name_from_filename(options.filename) || 'Component',
  options,
  stats,
  warnings
);
Component中几个关键的步骤:
this.walk_module_js();
this.walk_instance_js_pre_template();
this.fragment = new Fragment(this, ast.html);
this.walk_instance_js_post_template();
我们没有声明过context='module'的script内容,所以跳过walk_module_js。
在walk_instance_js_pre_template中调用create_scopes来解析script标签内的作用域:
const { scope: instance_scope, map, globals } = create_scopes(script.content);
可以把这些变量打印出来看下console.log('svelte Component walk_instance_js_pre_template', instance_scope, map, globals);
create_scopes内部是使用了periscopic的analyse方法。
import { analyze, Scope, extract_names, extract_identifiers } from 'periscopic';

/**
 * @param {import('estree').Node} expression
 */
export function create_scopes(expression) {
  return analyze(expression);
}
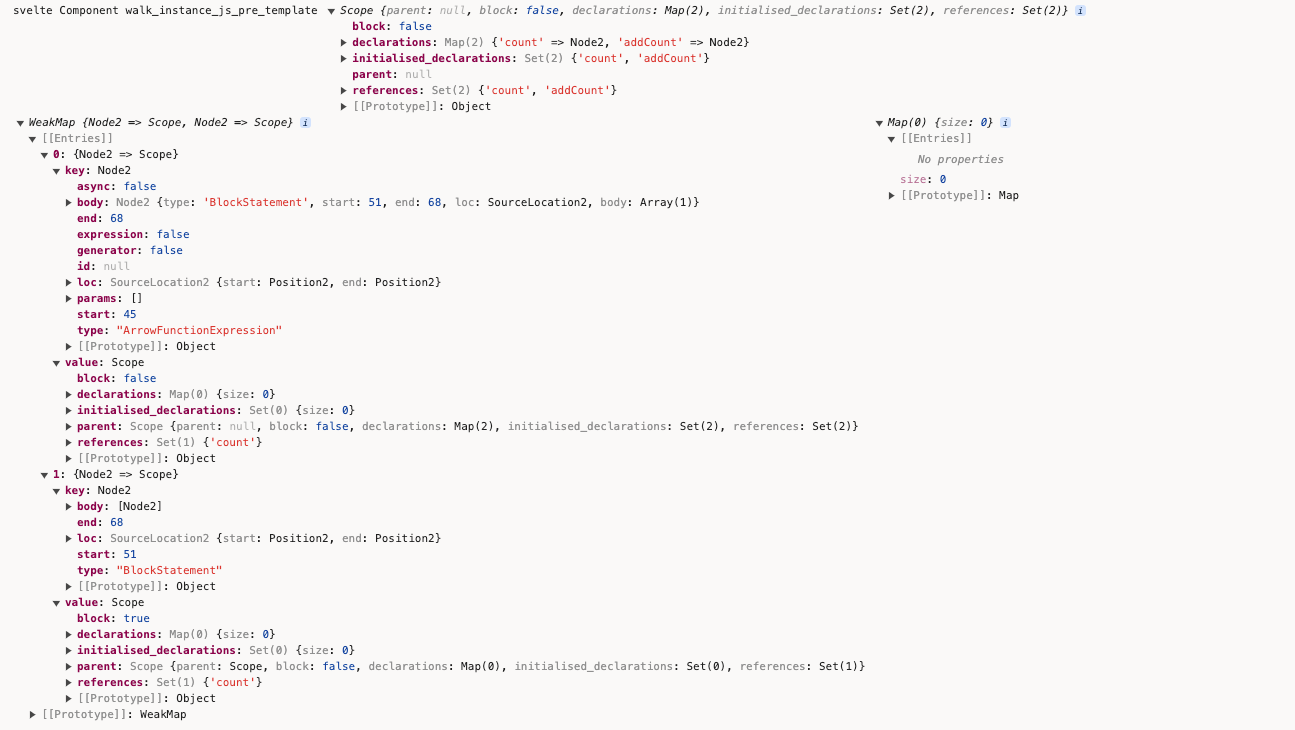
调用this.add_var()将变量存入vars中:
add_var(node, variable, add_to_lookup = true) {
  this.vars.push(variable);
  if (add_to_lookup) {
    if (this.var_lookup.has(variable.name)) {
      const exists_var = this.var_lookup.get(variable.name);
      if (exists_var.module && exists_var.imported) {
        this.error(/** @type {any} */ (node), compiler_errors.illegal_variable_declaration);
      }
    }
    this.var_lookup.set(variable.name, variable);
  }
}
打印出来看下:
  this.walk_instance_js_pre_template();
+ console.log('svelte Component this', this);
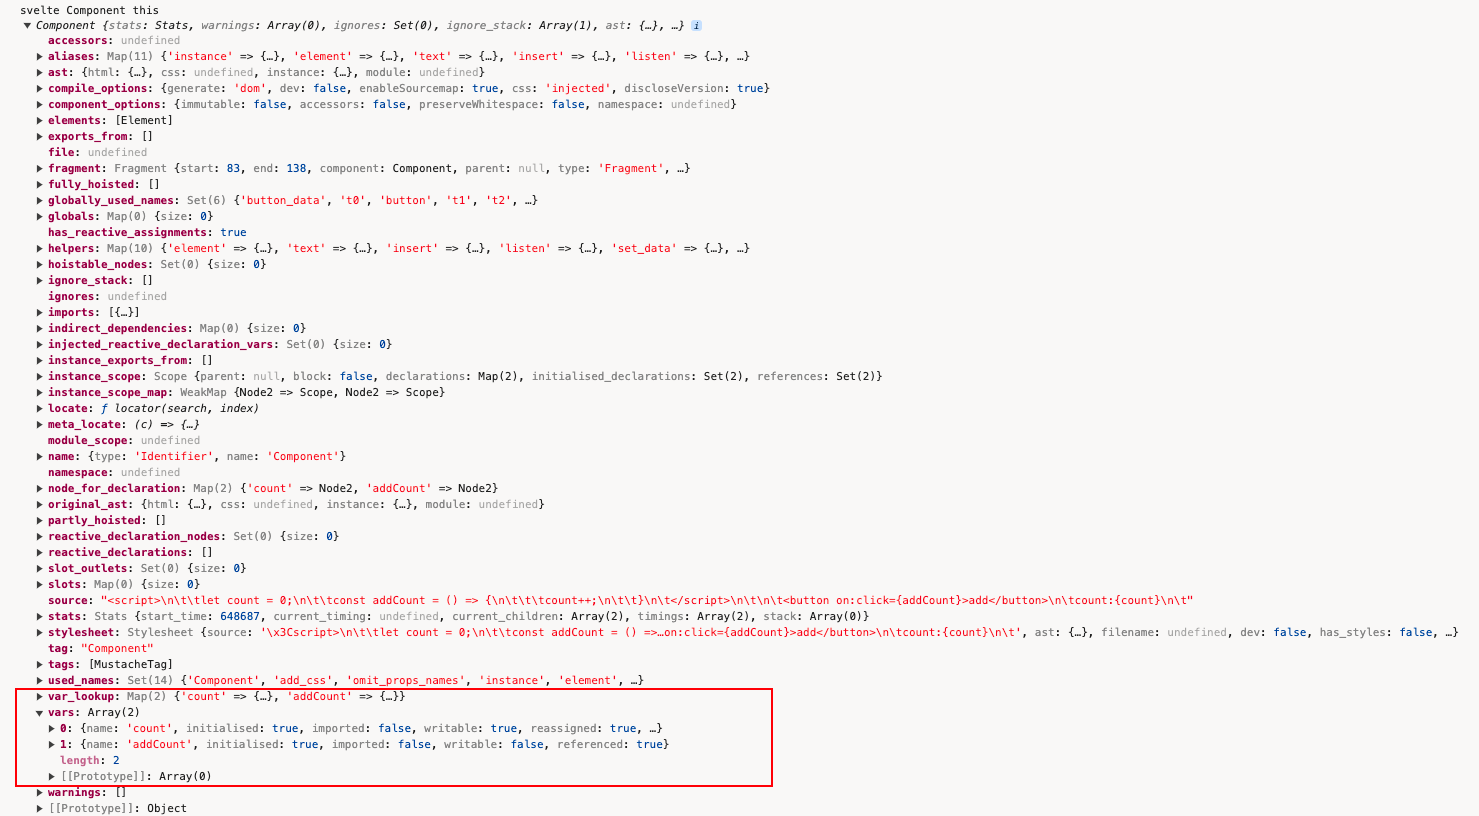
执行完this.walk_instance_js_pre_template();,继续下一步:
this.fragment = new Fragment(this, ast.html);
Fragment内部,执行map_children方法:
export default class Fragment extends Node {
  constructor(component, info) {
    const scope = new TemplateScope();
    super(component, null, scope, info);
    this.scope = scope;
    this.children = map_children(component, this, scope, info.children);
  }
}
  this.children = map_children(component, this, scope, info.children);
+ console.log('svelte Fragment children', this.children);

把数组的每项展开看下:
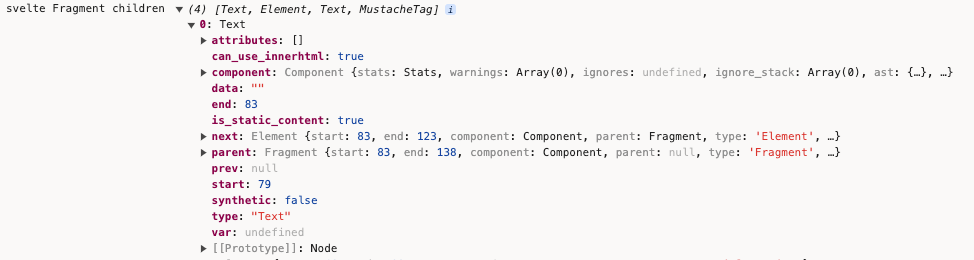
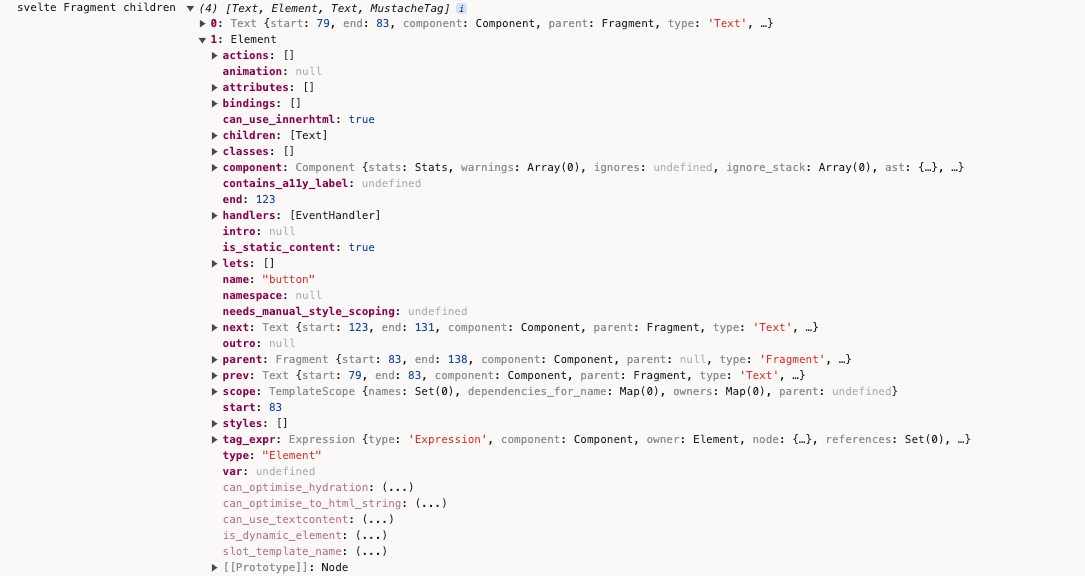

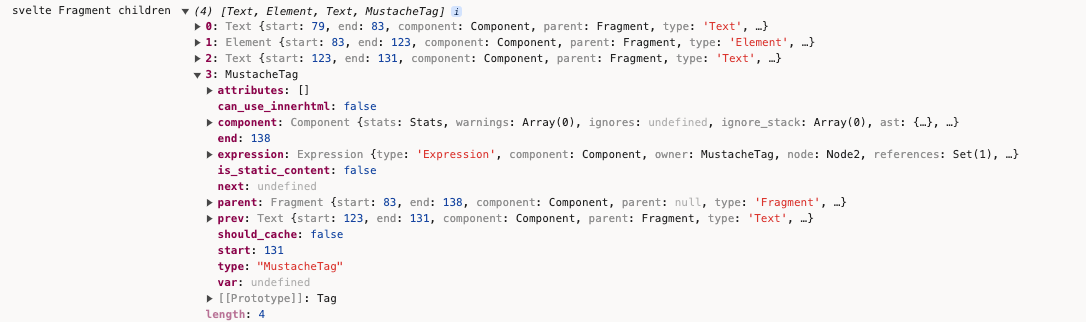
map_children的作用是将ast中的节点进行转换。
执行完new Fragment(),继续下一步:
walk_instance_js_post_template() {
  const script = this.ast.instance;
  if (!script) return;
  this.post_template_walk();
  this.hoist_instance_declarations();
  this.extract_reactive_declarations();
  this.check_if_tags_content_dynamic();
}
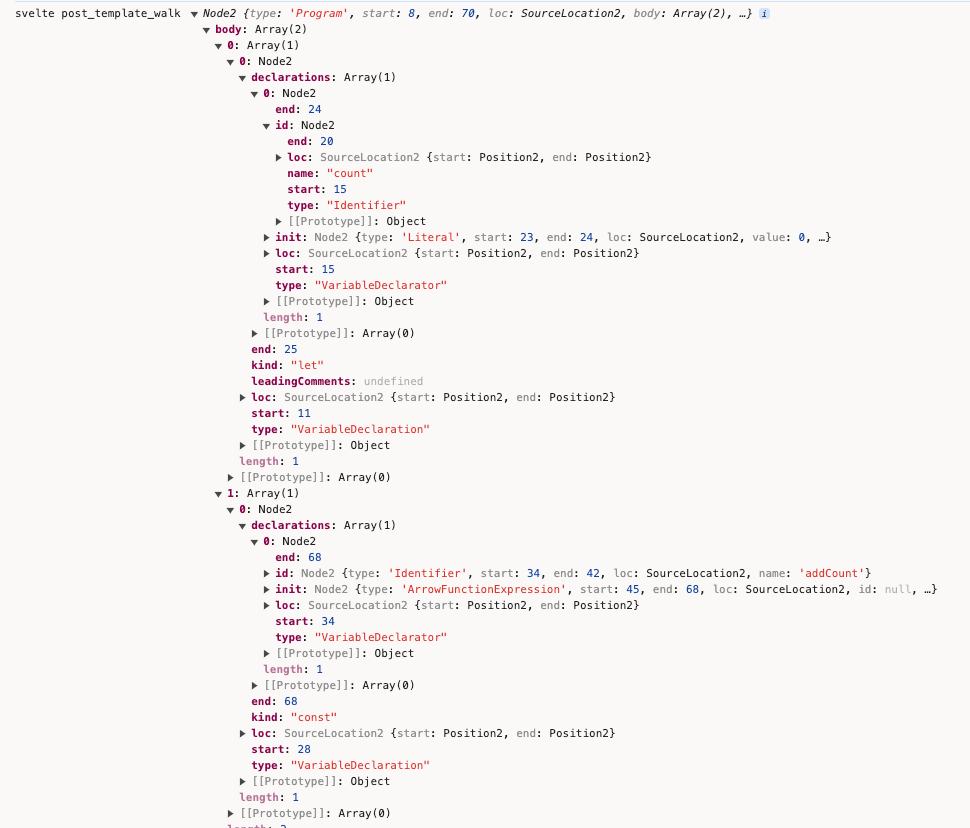
执行walk_instance_js_post_template中的this.post_template_walk
walk的content就是ast.instance.content的内容。
post_template_walk() {
  const script = this.ast.instance;
  if (!script) return;
  const component = this;
  const { content } = script;

  ...

  walk(content, {
    enter(node, parent, prop, index) {},
    leave(node) {}
  })
}
把content打印出来看下:
这个walk_instance_js_post_template的主要作用是:
对节点进行一些额外的检查,例如检查是否有未关闭的标签,是否有不合法的属性等。
对节点进行一些优化,例如移除不必要的空白节点,合并连续的文本节点等。
收集一些信息,例如收集所有使用的组件,收集所有的依赖等。
const component = new Component(
ast,
source,
options.name || get_name_from_filename(options.filename) || 'Component',
options,
stats,
warnings
);
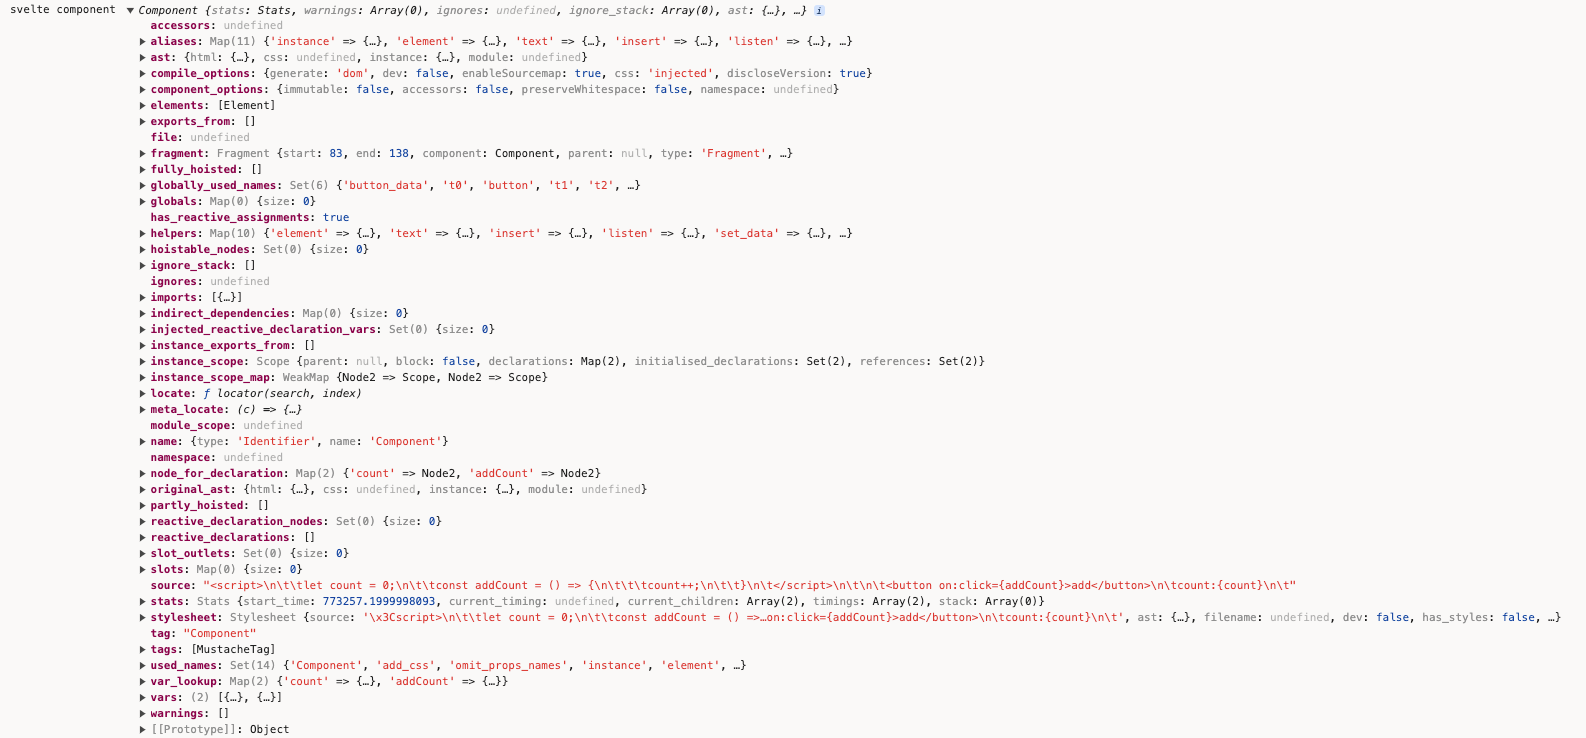
+ console.log('svelte component', component);
把new Component()的结果打印出来看下:
render_dom
往下执行render_dom,查看下render_dom的执行逻辑:
const result =
  options.generate === false
    ? null
    : options.generate === 'ssr'
    ? render_ssr(component, options)
    : render_dom(component, options);
点击render_dom进入内部,内部有个Renderer:
const renderer = new Renderer(component, options);
Renderer内部:
this.block = new Block({
  renderer: this,
  name: null,
  type: 'component',
  key: null,
  bindings: new Map(),
  dependencies: new Set()
});
this.block.has_update_method = true;
this.fragment = new FragmentWrapper(
  this,
  this.block,
  component.fragment.children,
  null,
  true,
  null
);
this.fragment.render(this.block, null, /** @type {import('estree').Identifier} */ (x`#nodes`));
看下Block的实现,Block的constructor如下:
constructor(options) {
  this.parent = options.parent;
  this.renderer = options.renderer;
  this.name = options.name;
  this.type = options.type;
  this.comment = options.comment;
  this.wrappers = [];
  // for keyed each blocks
  this.key = options.key;
  this.first = null;
  this.bindings = options.bindings;
  this.chunks = {
    declarations: [],
    init: [],
    create: [],
    claim: [],
    hydrate: [],
    mount: [],
    measure: [],
    restore_measurements: [],
    fix: [],
    animate: [],
    intro: [],
    update: [],
    outro: [],
    destroy: []
  };
  this.has_animation = false;
  this.has_intro_method = false; // a block could have an intro method but not intro transitions, e.g. if a sibling block has intros
  this.has_outro_method = false;
  this.outros = 0;
  this.get_unique_name = this.renderer.component.get_unique_name_maker();
  this.aliases = new Map();
  if (this.key) this.aliases.set('key', this.get_unique_name('key'));
}
 用来表示一个代码块的类,它包含了一些关于这个代码块的信息,例如它的类型,它的依赖,它的绑定等。
了解完Block,下一步FragmentWrapper:
this.fragment = new FragmentWrapper(
  this,
  this.block,
  component.fragment.children,
  null,
  true,
  null
);
Svelte内部用来表示一个模板片段的类,它包含了一些关于这个模板片段的信息,例如它的子节点,它的父节点等。
继续下一步:
this.fragment.render(this.block, null, /** @type {import('estree').Identifier} */ (x`#nodes`));
就是FragmentWrapper内部的render方法:
render(block, parent_node, parent_nodes) {
  for (let i = 0; i < this.nodes.length; i += 1) {
    this.nodes[i].render(block, parent_node, parent_nodes);
  }
}

这里的nodes是调用各个类型的wrapper实例化后的对象,每个wrapper类有自己的render方法:
const wrappers = {
  AwaitBlock,
  Body,
  Comment,
  DebugTag,
  Document,
  EachBlock,
  Element,
  Head,
  IfBlock,
  InlineComponent,
  KeyBlock,
  MustacheTag,
  Options: null,
  RawMustacheTag,
  Slot,
  SlotTemplate,
  Text,
  Title,
  Window
};
简单看一些wrapper的实现,比如Text Wrapper:
render(block, parent_node, parent_nodes) {
  if (this.skip) return;
  const use_space = this.use_space();
  const string_literal = {
    type: 'Literal',
    value: this.data,
    loc: {
        start: this.renderer.locate(this.node.start),
        end: this.renderer.locate(this.node.end)
    }
  };
  block.add_element(
    this.var,
    use_space ? x`@space()` : x`@text(${string_literal})`,
    parent_nodes &&
        (use_space
          ? x`@claim_space(${parent_nodes})`
          : x`@claim_text(${parent_nodes}, ${string_literal})`),
    /** @type {import('estree').Identifier} */ (parent_node)
  );
}
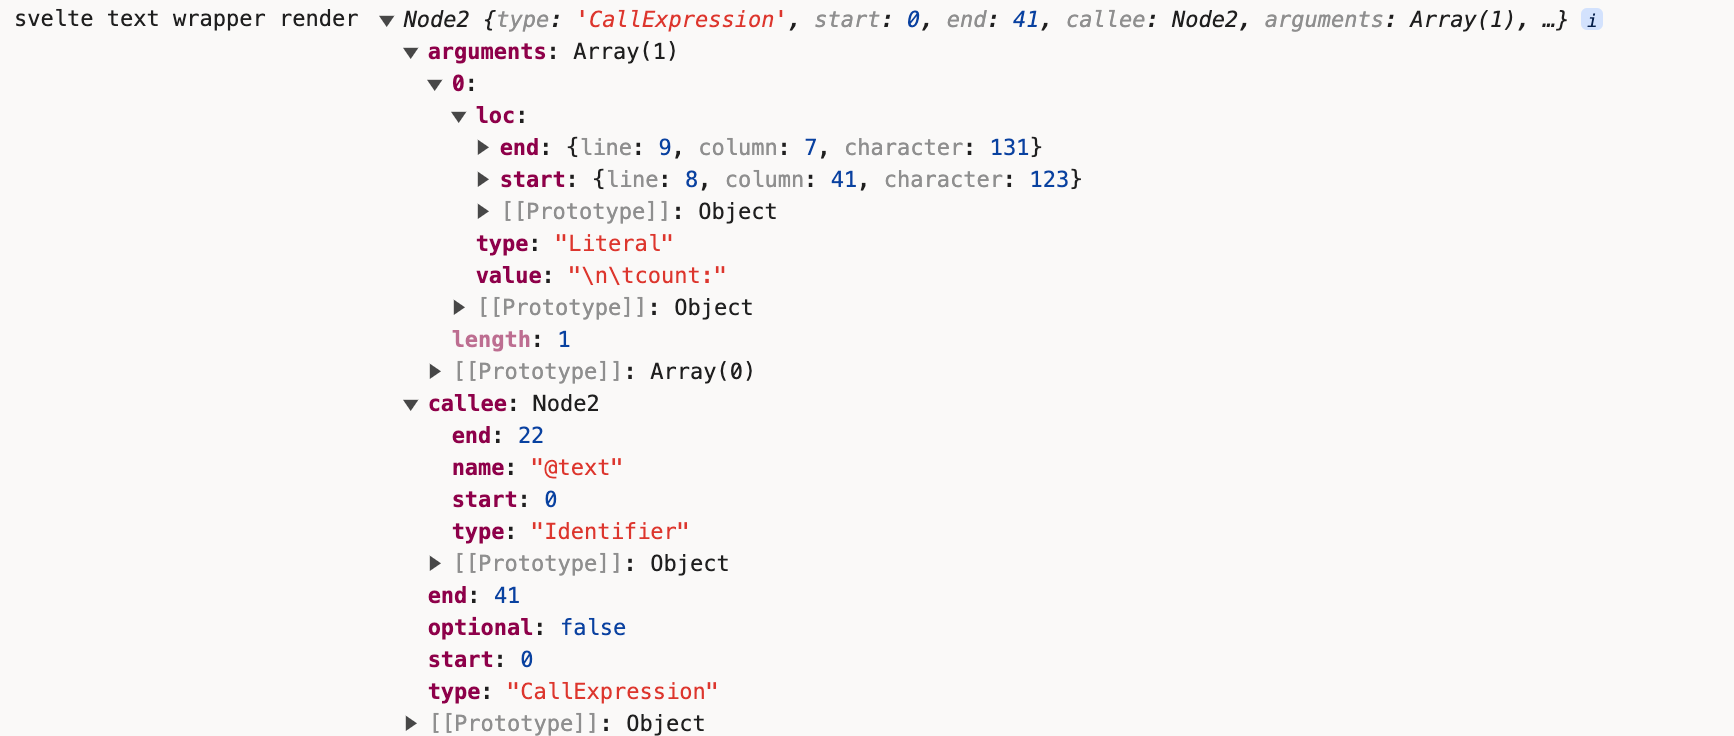
这里调用了code-red的x方法,把内容打印出来看下:
+ console.log('svelte text wrapper render', x`@text(${string_literal})`);
  block.add_element(
  this.var,
  use_space ? x`@space()` : x`@text(${string_literal})`,
  ...
Element的render方法:
render(block, parent_node, parent_nodes) {
  if (this.child_dynamic_element) {
    this.render_dynamic_element(block, parent_node, parent_nodes);
  } else {
    this.render_element(block, parent_node, parent_nodes);
  }
}
看下这个render_element的实现:
render_element(block, parent_node, parent_nodes) {
const { renderer } = this;
const hydratable = renderer.options.hydratable;
if (this.node.name === 'noscript') return;
const node = this.var;
const nodes = parent_nodes && block.get_unique_name(`${this.var.name}_nodes`);
const children = x`@children(${this.node.name === 'template' ? x`${node}.content` : node})`;
block.add_variable(node);
const render_statement = this.get_render_statement(block);
block.chunks.create.push(b`${node} = ${render_statement};`);
const { can_use_textcontent, can_optimise_to_html_string, can_optimise_hydration } = this.node;
...
if (parent_node) {
...
} else {
const insert = b`@insert(#target, ${node}, #anchor);`;
((insert[0]).expression).callee.loc = {
start: this.renderer.locate(this.node.start),
end: this.renderer.locate(this.node.end)
};
block.chunks.mount.push(insert);
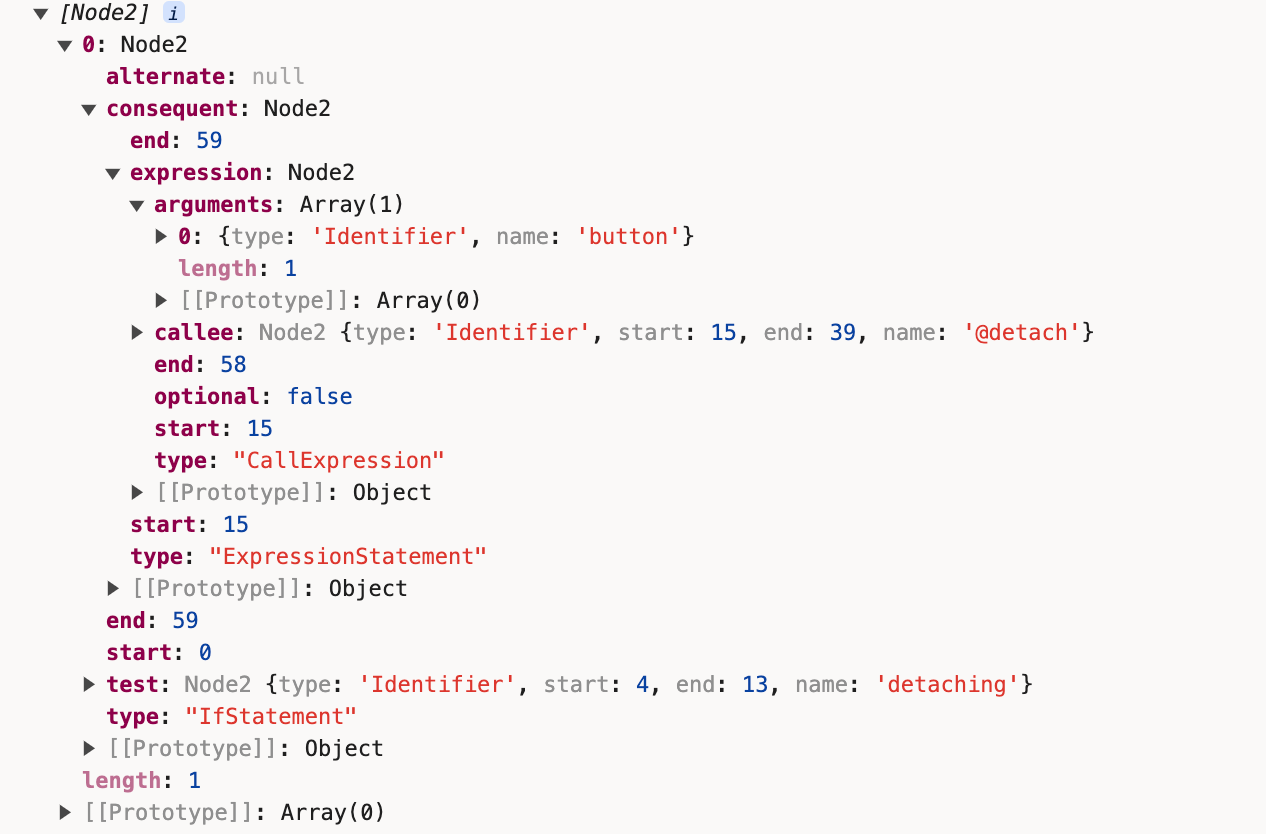
block.chunks.destroy.push(b`if (detaching) @detach(${node});`);
}
if (can_optimise_to_html_string && (!hydratable || can_optimise_hydration)) {
if (this.fragment.nodes.length === 1 && this.fragment.nodes[0].node.type === 'Text') {
/** @type {import('estree').Node} */
let text = string_literal(
/** @type {import('../Text.js').default} */ (this.fragment.nodes[0]).data
);
...
block.chunks.create.push(b`${node}.textContent = ${text};`);
...
} else {
...
}
} else {
this.fragment.nodes.forEach((child) => {
child.render(block, this.node.name === 'template' ? x`${node}.content` : node, nodes, {
element_data_name: this.element_data_name
});
});
}
...
block.renderer.dirty(this.node.tag_expr.dynamic_dependencies());
}
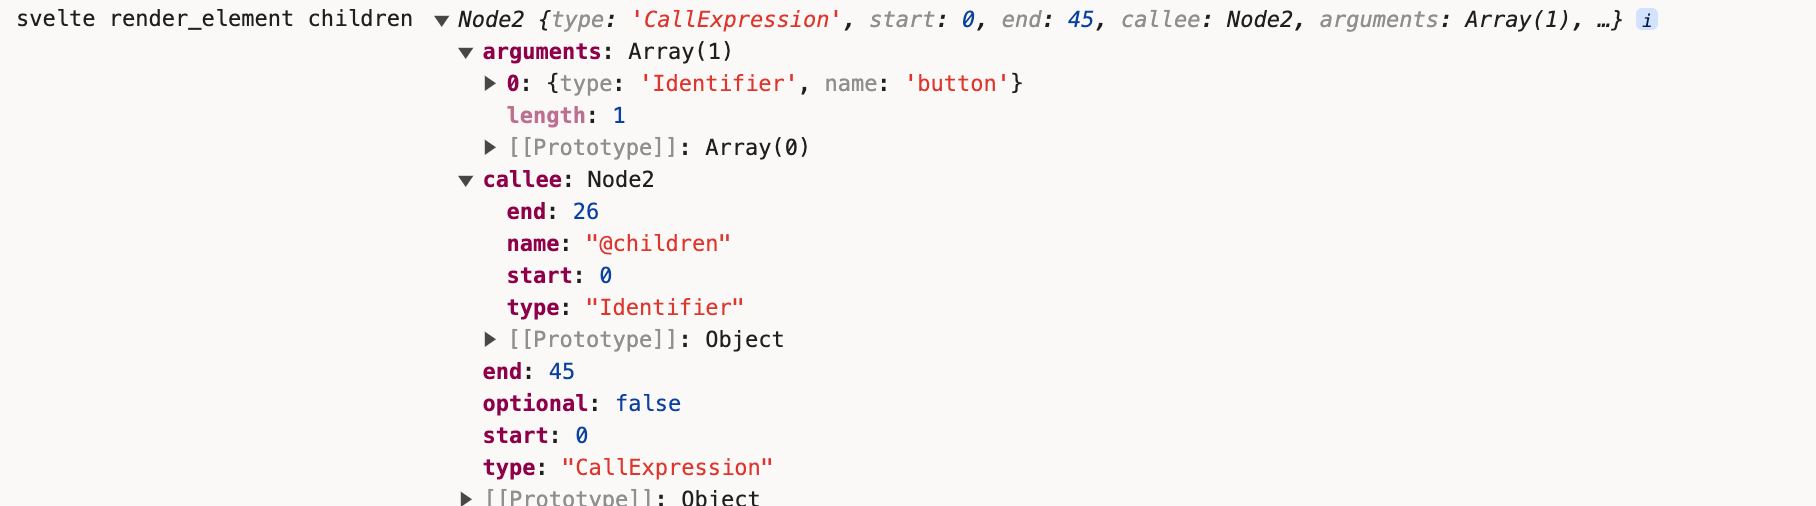
我们尝试把它的children打印出来看下:
const node = this.var;
const nodes = parent_nodes && block.get_unique_name(`${this.var.name}_nodes`); // if we're in unclaimable territory, i.e. <head>, parent_nodes is null
const children = x`@children(${this.node.name === 'template' ? x`${node}.content` : node})`;
block.add_variable(node);
+ console.log('svelte render_element children', children);
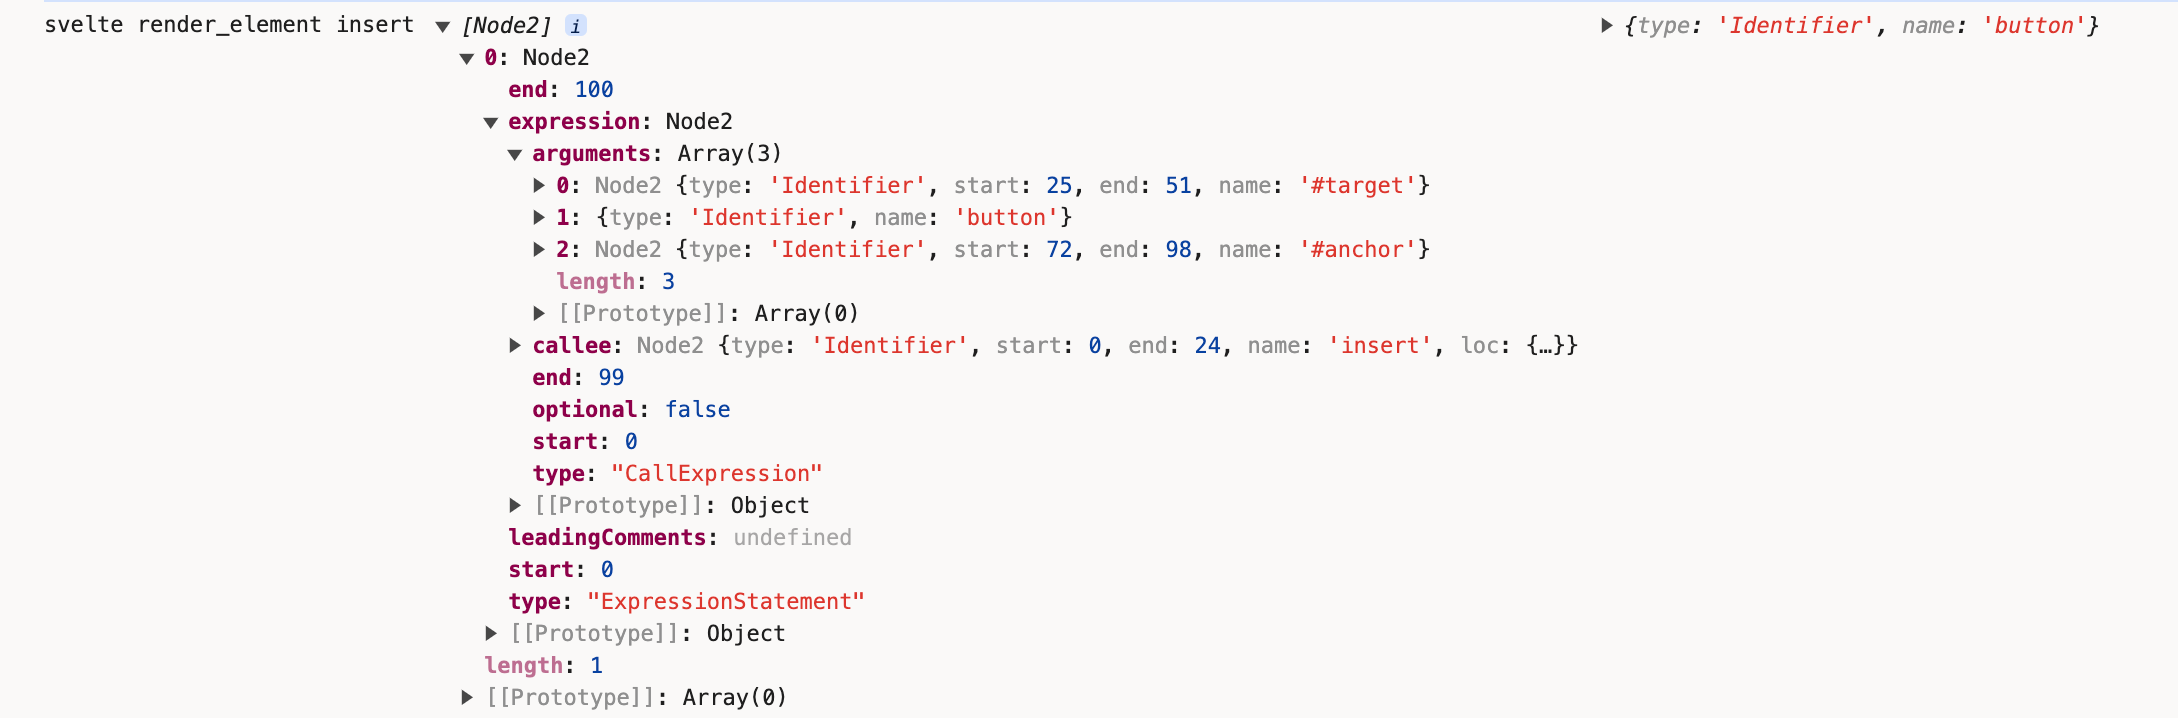
const render_statement = this.get_render_statement(block);
  const insert = b`@insert(#target, ${node}, #anchor);`;
  /** @type {import('estree').CallExpression} */ (
    /** @type {import('estree').ExpressionStatement} */ (insert[0]).expression
  ).callee.loc = {
    start: this.renderer.locate(this.node.start),
    end: this.renderer.locate(this.node.end)
  };
  block.chunks.mount.push(insert);
  block.chunks.destroy.push(b`if (detaching) @detach(${node});`);
+ console.log('svelte render_element insert', insert, node, b`if (detaching) @detach(${node});`)
this.fragment.nodes.forEach((child) => {
  child.render(block, this.node.name === 'template' ? x`${node}.content` : node, nodes, {
    element_data_name: this.element_data_name
  });
});
依次调用render方法。
MustachTag的render方法:
render(block, parent_node, parent_nodes, data) {
  const contenteditable_attributes =
    this.parent instanceof ElementWrapper &&
    this.parent.attributes.filter((a) => a.node.name === 'contenteditable');
  const spread_attributes =
    this.parent instanceof ElementWrapper &&
    this.parent.attributes.filter((a) => a.node.is_spread);

  ...
  const { init } = this.rename_this_method(block, (value) => {
    if (contenteditable_attr_value) {
      ...
    } else {
      return x`@set_data(${this.var}, ${value})`;
    }
  });
  block.add_element(
    this.var,
    x`@text(${init})`,
    parent_nodes && x`@claim_text(${parent_nodes}, ${init})`,
    parent_node
  );
}
const { init } = this.rename_this_method(block, (value) => {
  if (contenteditable_attr_value) {
    if (contenteditable_attr_value === true) {
      return x`@set_data_contenteditable(${this.var}, ${value})`;
    } else {
      return x`@set_data_maybe_contenteditable(${this.var}, ${value}, ${contenteditable_attr_value})`;
    }
  } else {
+   console.log('svelte mustachetag rename_this_method', x`@set_data(${this.var}, ${value})`, this.var, value);
    return x`@set_data(${this.var}, ${value})`;
  }
});

返回到packages/svelte/src/compiler/compile/render_dom/index.js
export default function dom(component, options) {
const { name } = component;
const renderer = new Renderer(component, options);
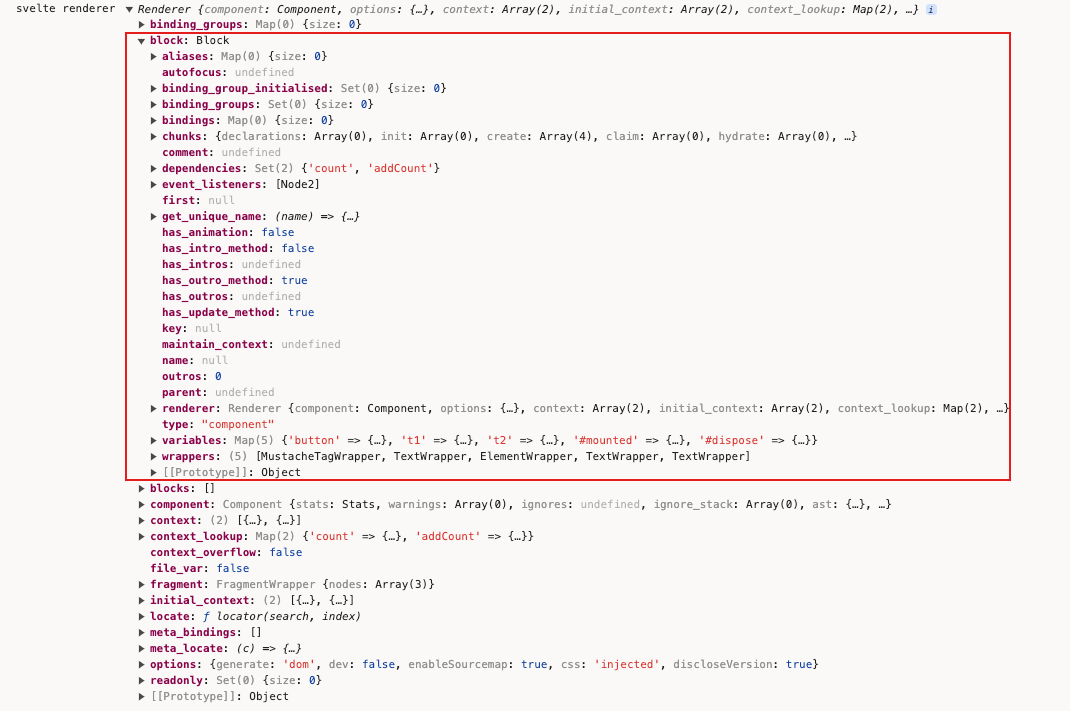
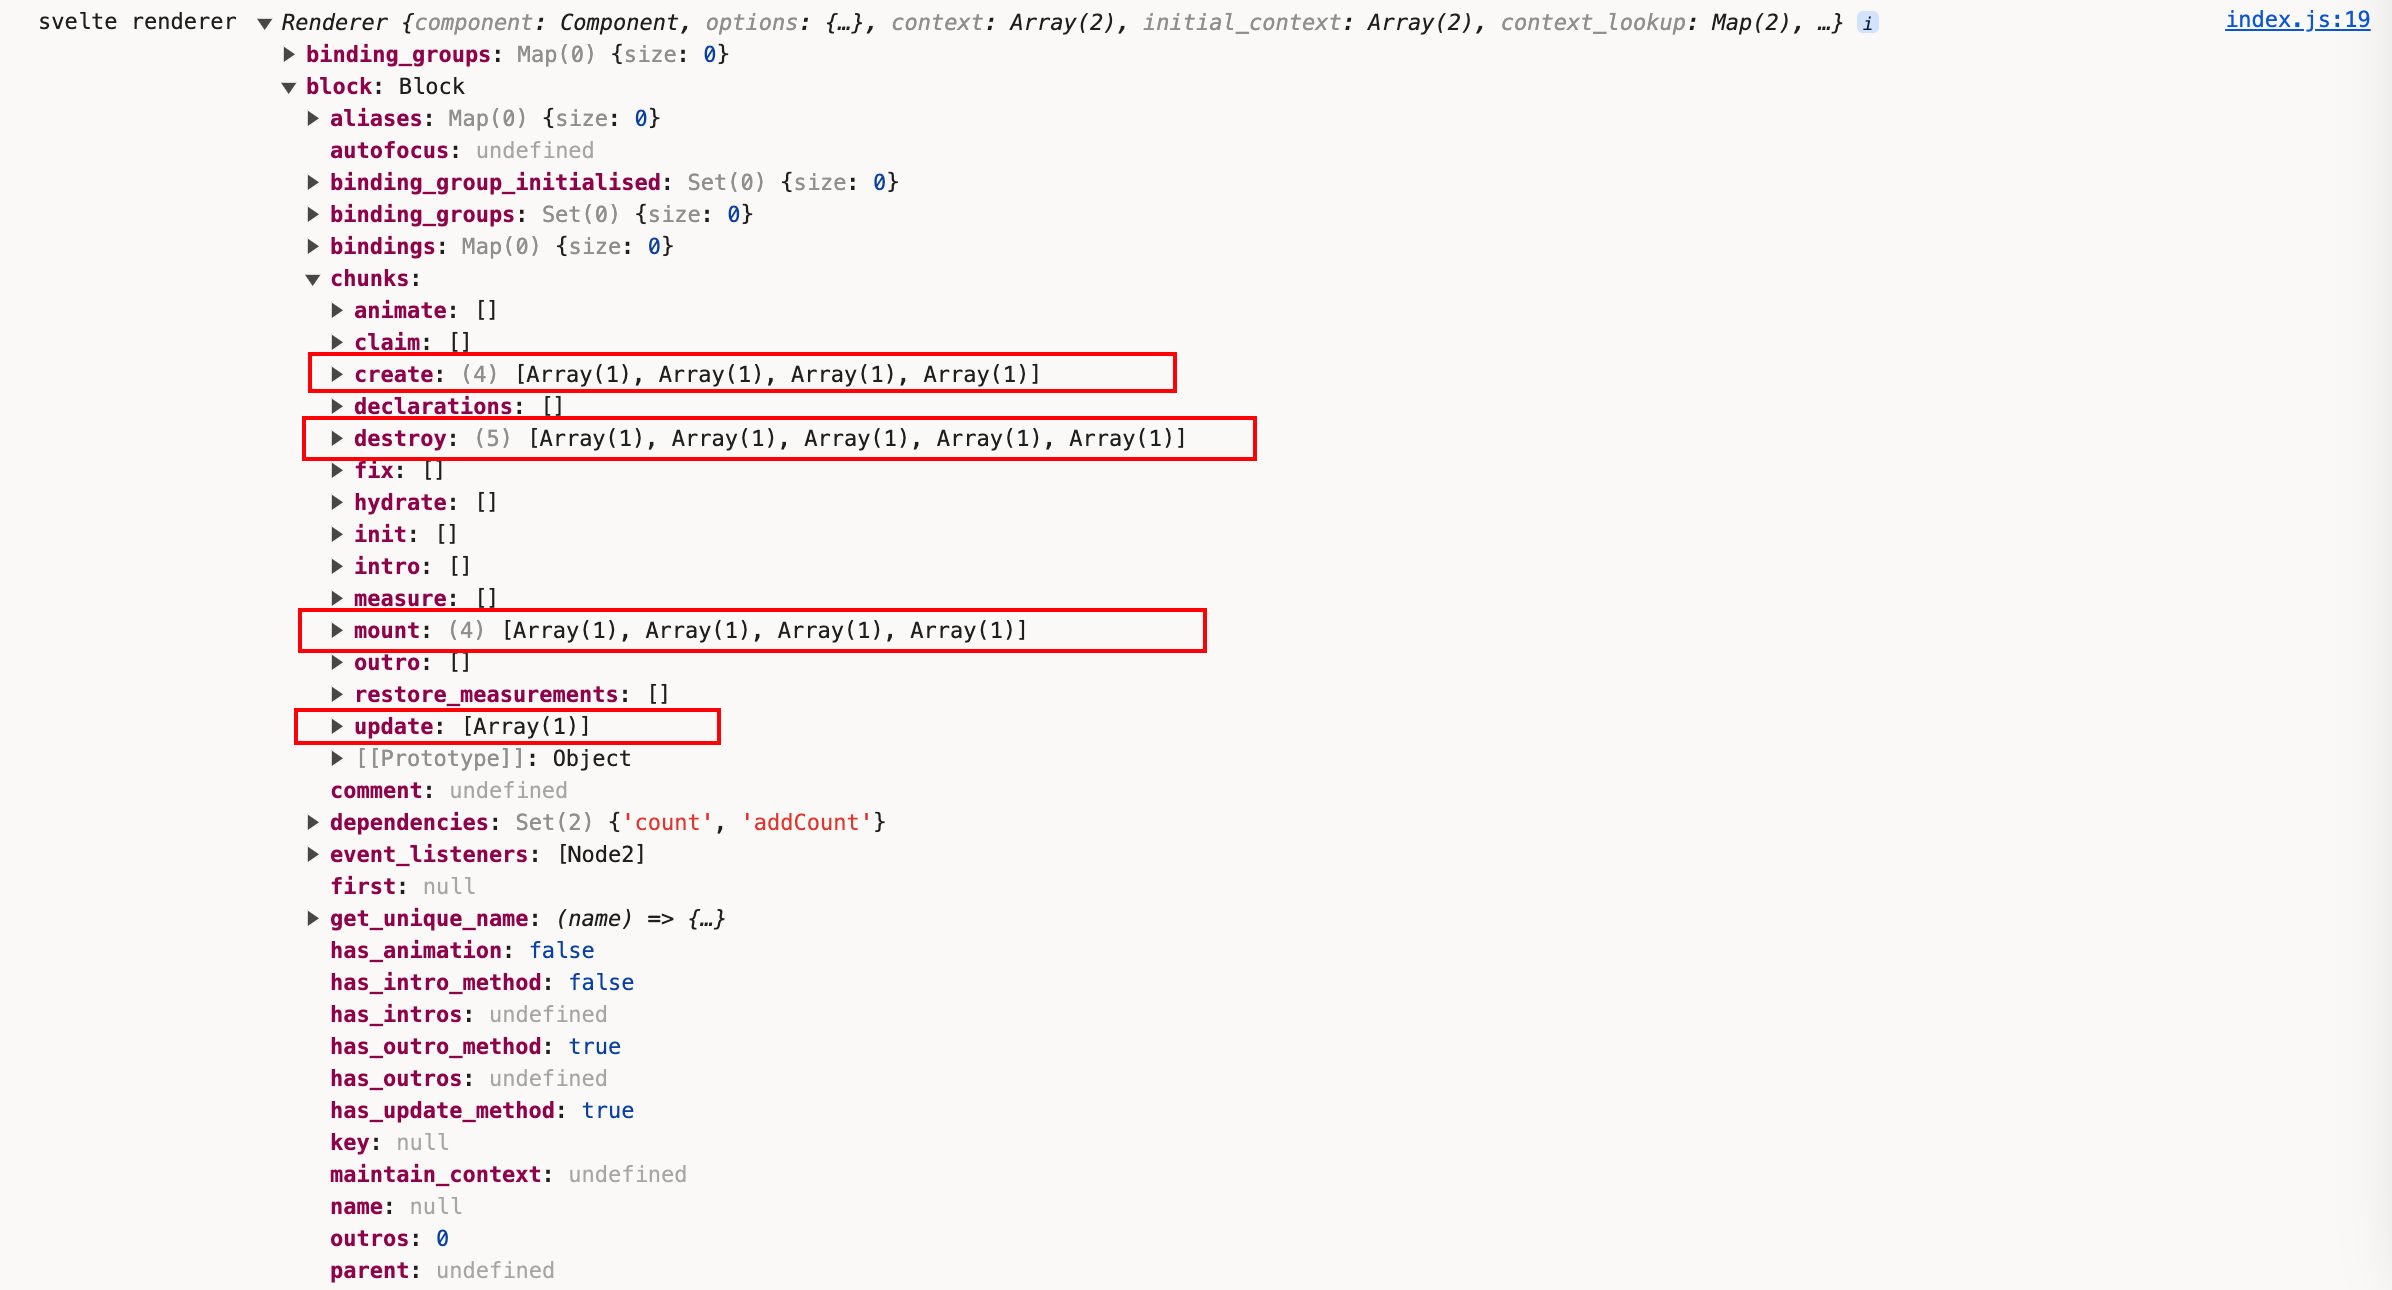
+ console.log('svelte renderer', renderer);
const { block } = renderer;
...
 在刚才查看各个render方法时,我们注意到它一直在操作
block.chunk,现在我们可以看到上面的create、mount、update和destroy上的逻辑代码已准备就绪。我们也知道了render_dom的主要作用就是把代码转化成能真正挂载到页面上的节点,同时处理了页面的各个生命周期。
render_dom中一段非常重要的解析:
walk(component.ast.instance.content, {
  enter(node) {
    ...
  },
  leave(node) {
    if (map.has(node)) {
      scope = scope.parent;
    }
    if (execution_context === node) {
      execution_context = null;
    }
    if (node.type === 'AssignmentExpression' || node.type === 'UpdateExpression') {
      const assignee = node.type === 'AssignmentExpression' ? node.left : node.argument;
      // normally (`a = 1`, `b.c = 2`), there'll be a single name
      // (a or b). In destructuring cases (`[d, e] = [e, d]`) there
      // may be more, in which case we need to tack the extra ones
      // onto the initial function call
      const names = new Set(extract_names(/** @type {import('estree').Node} */ (assignee)));
      this.replace(invalidate(renderer, scope, node, names, execution_context === null));
    }
  }
});
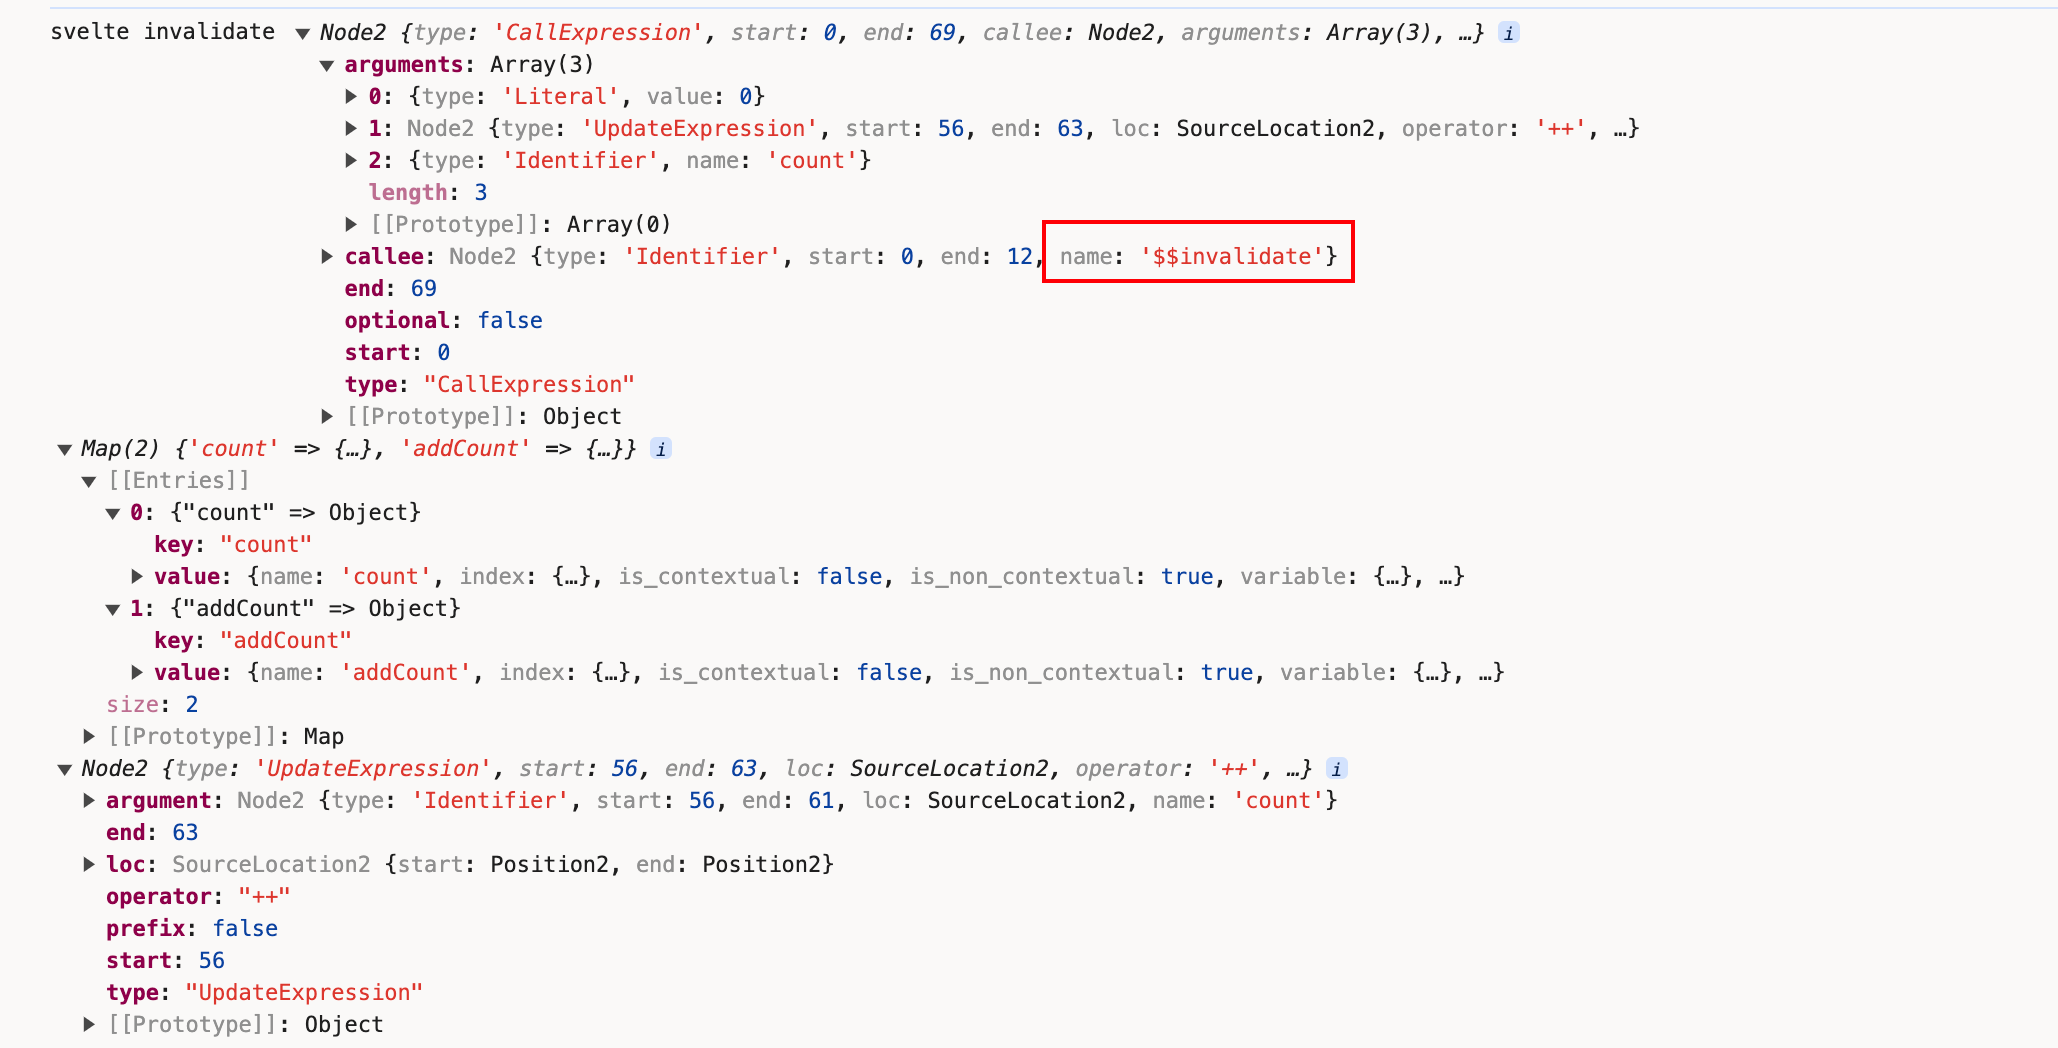
大家对this.replace还有印象吗?不错,我们在《库》章节演示estree-walk时演示过这个方法,this.replace(invalidate(renderer, scope, node, names, execution_context === null))对Svelte文件中涉及到更新的代码进行替换,替换成$$invalidate相关形式的代码。
查看下invalidate的逻辑,packages/svelte/src/compiler/compile/render_dom/invalidate.js:
invalidate = x`$$invalidate(${
  renderer.context_lookup.get(head.name).index
}, ${node}, ${extra_args})`;
+ console.log('svelte invalidate', invalidate, renderer.context_lookup, node);
继续回到render_dom方法
const has_create_fragment = component.compile_options.dev || block.has_content();
if (has_create_fragment) {
  body.push(b`
    function create_fragment(#ctx) {
      ${block.get_contents()}
    }
  `);
}
很明显,这段就是到时会编译到页面上的create_fragment方法。我们可以把block.get_contents打印出来看一下
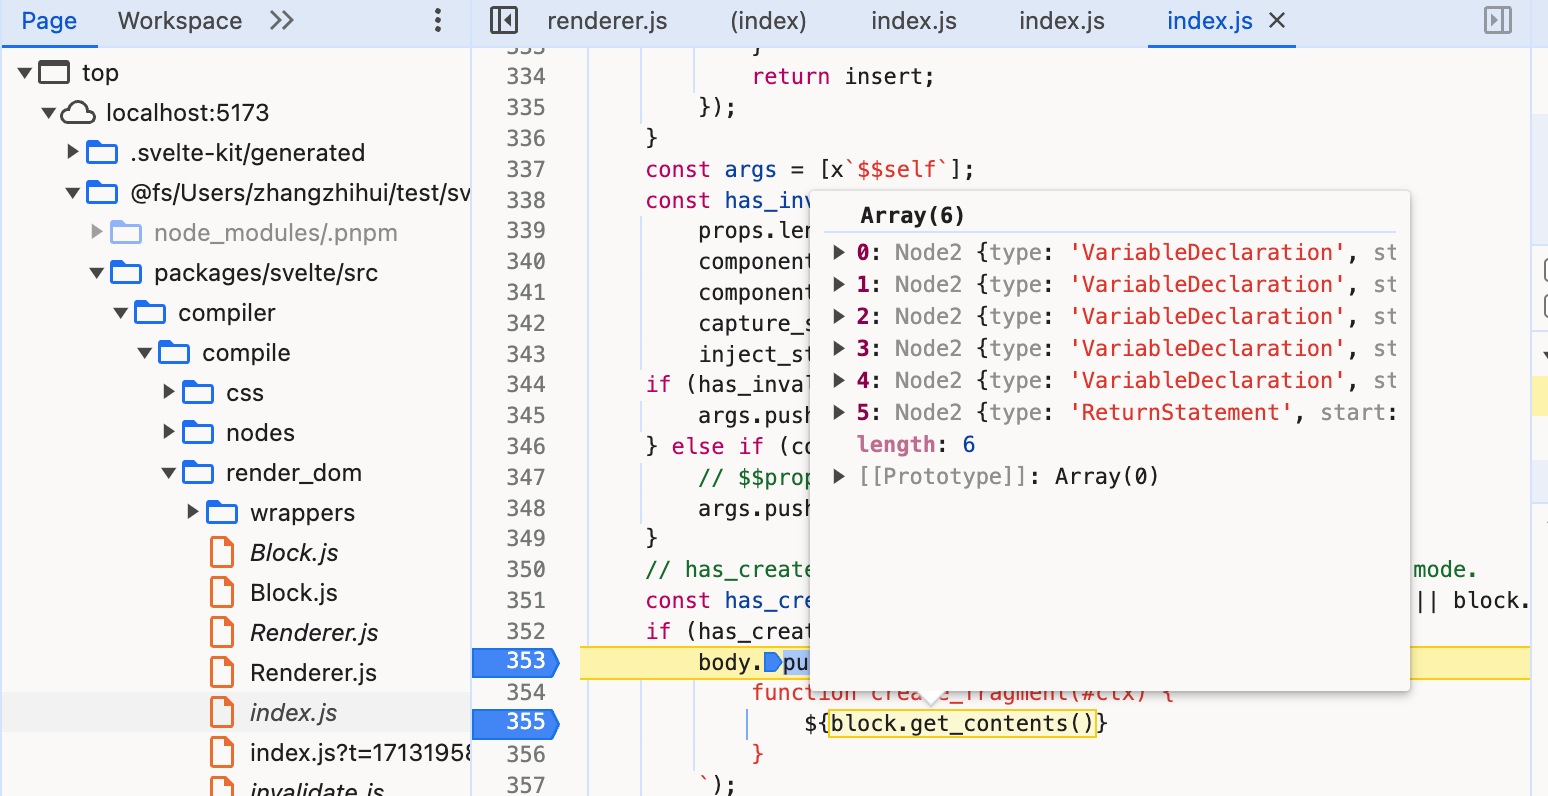 笔者之前都是使用console.log这种粗暴直接的方法来进行演示,一是快速直接,二是在控制台中打印出数据的全貌便于浏览。如果读者对断点调试得心应手,也可像上图般对各个关键节点进行打断点调试。
const condition =
  !uses_rest_or_props && writable.length > 0 && renderer.dirty(writable, true);
let statement = d.node;
if (condition)
  statement = /** @type {import('estree').Statement} */ (
    b`if (${condition}) { ${statement} }`[0]
  );
此段代码是用来编译条件判断ifblock的展示。
继续往下:
body.push(b`
  function ${definition}(${args}) {
    ${injected.map((name) => b`let ${name};`)}

    ${rest}

    ${reactive_store_declarations}

    ${reactive_store_subscriptions}

    ${resubscribable_reactive_store_unsubscribers}

    ${
      component.slots.size || component.compile_options.dev || uses_slots
        ? b`let { $$slots: #slots = {}, $$scope } = $$props;`
        : null
    }
    ...

    ${instance_javascript}

    ...

    ${/* before reactive declarations */ props_inject}

    ${
      reactive_declarations.length > 0 &&
      b`
    $$self.$$.update = () => {
      ${reactive_declarations}
    };
    `
    }

    ...

    return ${return_value};
  }
`);
我们把definition和args打印出来看下
 从打印结果我们能够推断出,这段代码编译后对应的是
function instance(){}
const superclass = {
  type: 'Identifier',
  name: options.dev ? '@SvelteComponentDev' : '@SvelteComponent'
};
...
const declaration = /** @type {import('estree').ClassDeclaration} */ (
  b`
  class ${name} extends ${superclass} {
    constructor(options) {
      super(${options.dev && 'options'});
      @init(this, options, ${definition}, ${
    has_create_fragment ? 'create_fragment' : 'null'
  }, ${not_equal}, ${prop_indexes}, ${optional_parameters});
      ${
        options.dev &&
        b`@dispatch_dev("SvelteRegisterComponent", { component: this, tagName: "${name.name}", options, id: create_fragment.name });`
      }
    }
  }
`[0]
);
push_array(declaration.body.body, accessors);
body.push(/** @type {any} */ (declaration));
这段代码则对应编译后的组件的类class X extends SvelteComponent {}
const result =
  options.generate === false
    ? null
    : options.generate === 'ssr'
    ? render_ssr(component, options)
    : render_dom(component, options);
+ console.log('svelte compile result', result);
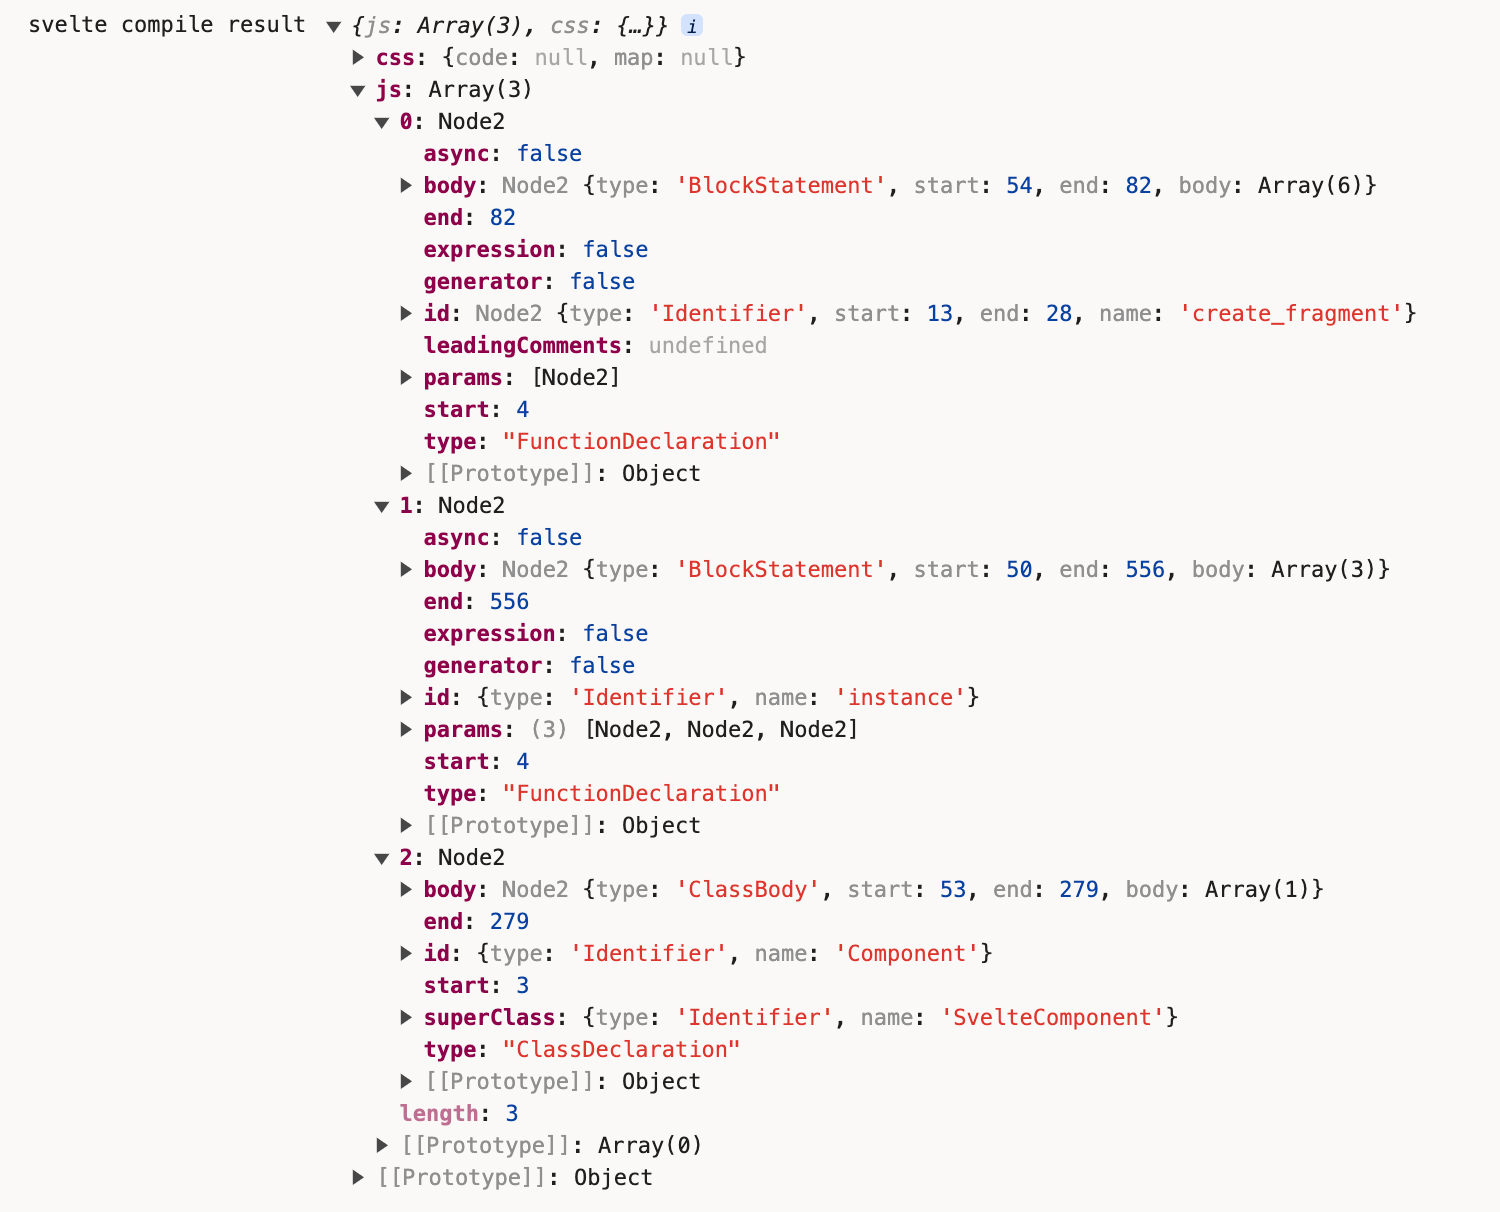
generate
终于来到编译的最后一步。
generate(result) {
  let js = null;
  let css = null;
  if (result) {

    /** @type {any} */
    const program = { type: 'Program', body: result.js };
    walk(program, {
      enter: (node, parent, key) => {
        if (node.type === 'Identifier') {
          ...
        }
      }
    });
    ...
    create_module(
      program,
      name,
      banner,
      compile_options.sveltePath,
      imported_helpers,
      referenced_globals,
      this.imports,
      this.vars
        .filter((variable) => variable.module && variable.export_name)
        .map((variable) => ({
          name: variable.name,
          as: variable.export_name
        })),
      this.exports_from
    );
    const js_sourcemap_enabled = check_enable_sourcemap(compile_options.enableSourcemap, 'js');
    if (!js_sourcemap_enabled) {
      js = print(program);
      js.map = null;
    } else {
      ...
    }
  }
  return {
    js,
    css,
    ast: this.original_ast,
    warnings: this.warnings,
    vars: this.get_vars_report(),
    stats: this.stats.render()
  };
}
create_module方法
export default function create_module(
  program,
  name,
  banner,
  svelte_path = 'svelte',
  helpers,
  globals,
  imports,
  module_exports,
  exports_from
) {
  const internal_path = `${svelte_path}/internal`;
  helpers.sort((a, b) => (a.name < b.name ? -1 : 1));
  globals.sort((a, b) => (a.name < b.name ? -1 : 1));
  return esm(
    program,
    name,
    banner,
    svelte_path,
    internal_path,
    helpers,
    globals,
    imports,
    module_exports,
    exports_from
  );
}

function esm(
  program,
  name,
  banner,
  svelte_path,
  internal_path,
  helpers,
  globals,
  imports,
  module_exports,
  exports_from
) {
  const import_declaration = {
    type: 'ImportDeclaration',
    specifiers: helpers.map((h) => ({
      type: 'ImportSpecifier',
      local: h.alias,
      imported: { type: 'Identifier', name: h.name }
    })),
    source: { type: 'Literal', value: internal_path }
  };

  ...

  program.body = b`
    /* ${banner} */

    ${import_declaration}
    ${internal_globals}
    ${imports}
    ${exports_from}

    ${program.body}

    export default ${name};
    ${exports}
  `;
}
核心就是编译生成页面最终的import和export部分的内容。

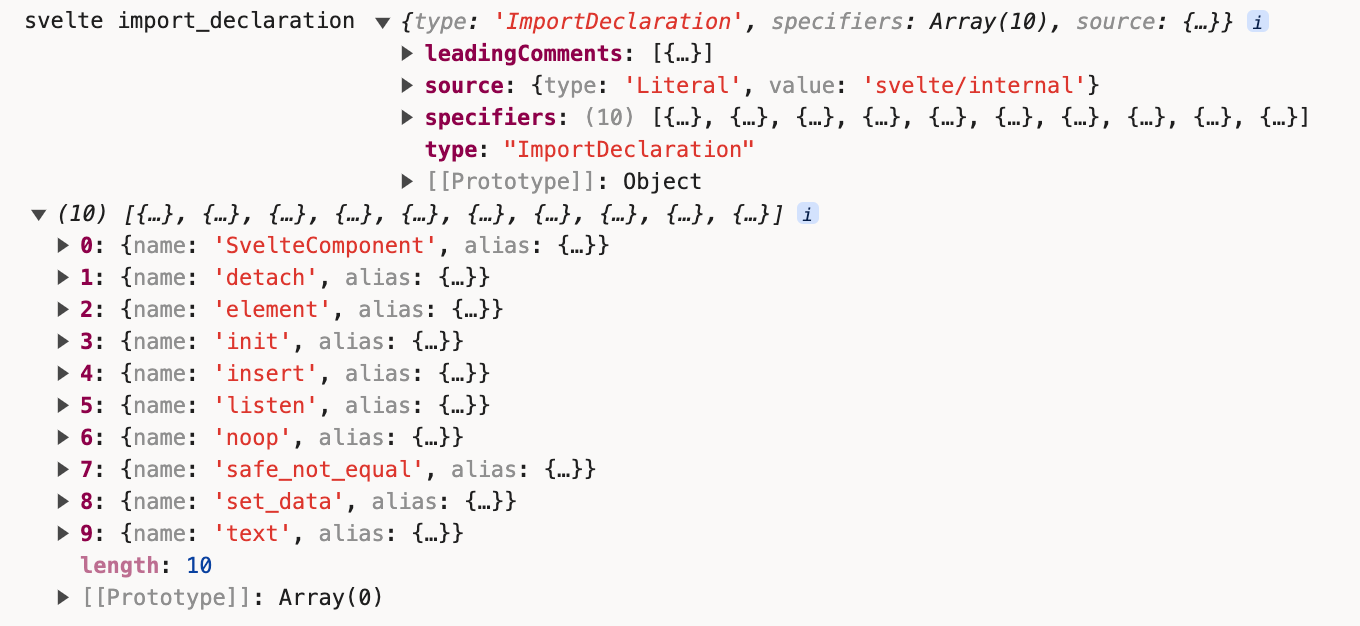
我们尝试把import部分的代码变量打印出来看下:
const import_declaration = {
  type: 'ImportDeclaration',
  specifiers: helpers.map((h) => ({
    type: 'ImportSpecifier',
    local: h.alias,
    imported: { type: 'Identifier', name: h.name }
  })),
  source: { type: 'Literal', value: internal_path }
};
+ console.log('svelte import_declaration', import_declaration, helpers);
最后经过code-red的print方法生成最终的js代码
if (!js_sourcemap_enabled) {
  js = print(program);
  js.map = null;
}
const result =
options.generate === false
? null
: options.generate === 'ssr'
? render_ssr(component, options)
: render_dom(component, options);
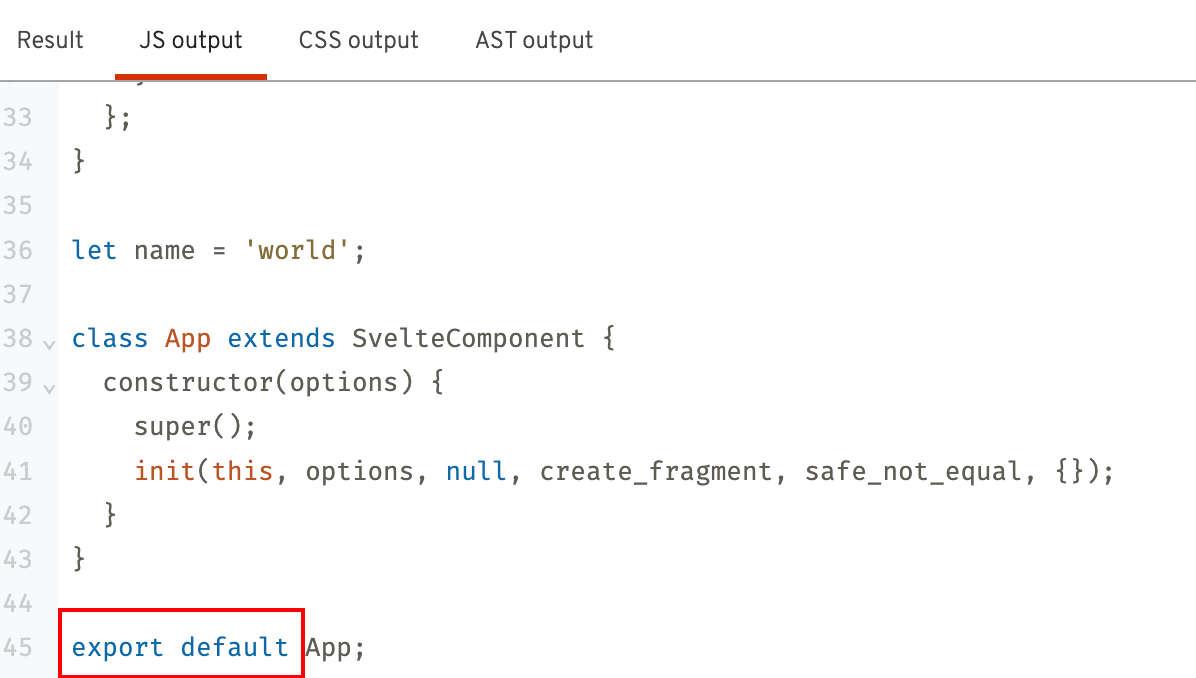
+ console.log('svelte final code',
+ component.generate(result),
+ component.generate(result).js.code
+ );

回看svelte-loader的代码,同样是返回js.code的代码。
https://github.com/sveltejs/svelte-loader/blob/master/index.js
最后提供一个compile阶段的思维导图:

runtime
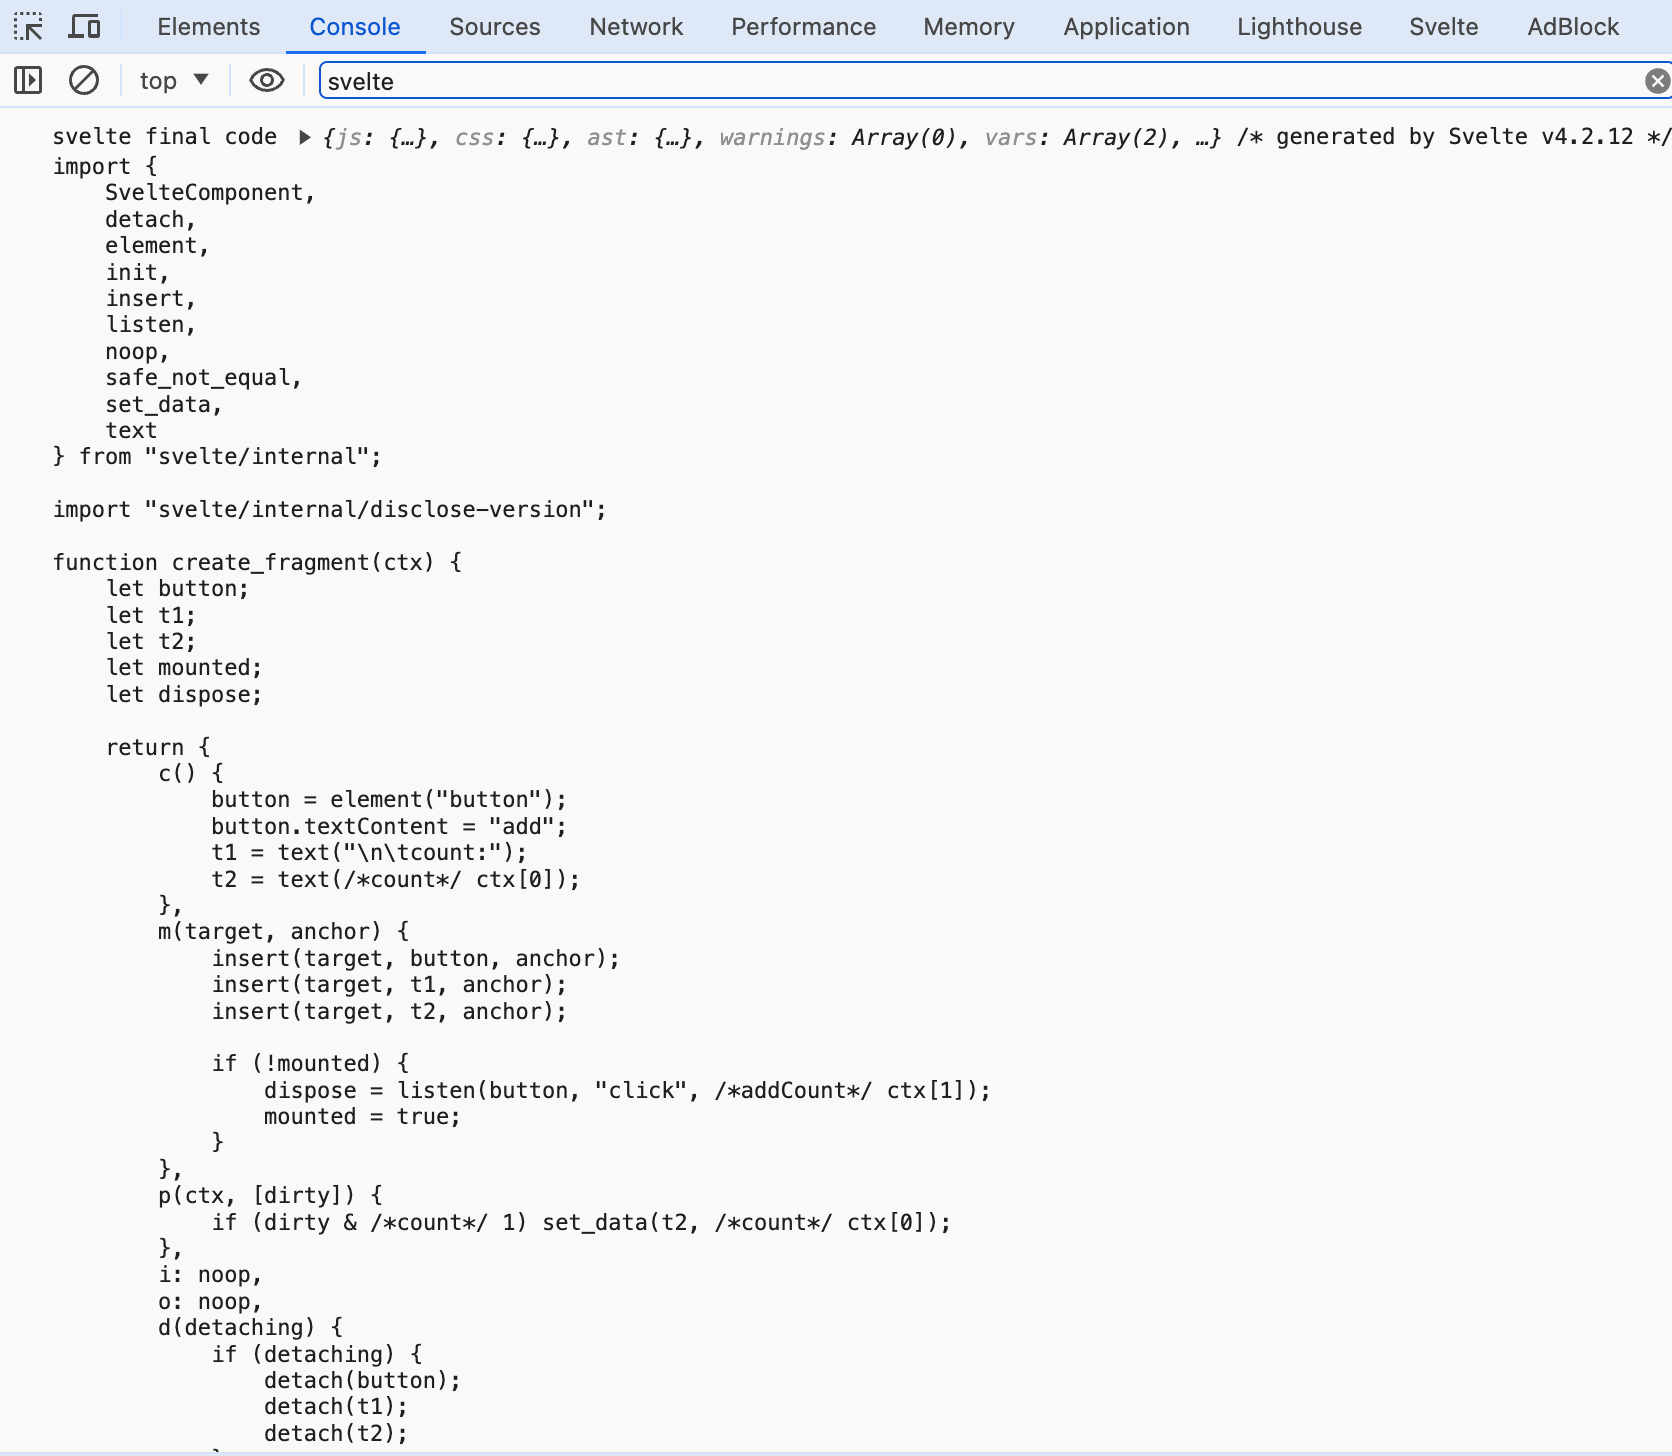
我们把在编译后得到的js代码复制进一个文件中index.js。
在svelte源码项目目录下新建一个目录叫test-runtime,新建一个index.html:
<div id="app"></div>
<script type="module" src="./index.js"></script>
修改index.js的几处地方:
- 把引用
svelte/internal的路径进行调整../packages/svelte/src/runtime/internal; - 把
import "svelte/internal/disclose-version";移除; - 注释最下面一行的
export default Component,改成:
new Component({
  target: document.querySelector('#app')
})
在test-runtime目录下
npm init -y
npm install vite
在package.json中添加运行指令:
"scripts": {
  "test": "echo \"Error: no test specified\" && exit 1",
+ "dev": "vite"
},
npm run dev把项目跑起来:

在runtime阶段,我们主要观察数据是如何更新的。
首先是当我们点击button时
if (!mounted) {
  dispose = listen(button, "click", /*addCount*/ ctx[1]);
  mounted = true;
}
这里click绑定的监听方法是ctx[1],经过前面的学习,我们知道,ctx数组就是instance方法执行后的返回值。
function instance($$self, $$props, $$invalidate) {
  let count = 0;

  const addCount = () => {
    $$invalidate(0, count++, count);
  };

  return [count, addCount];
}
也就是我们点击按钮之后,会执行addCount方法,addCount内部的赋值语句已经被重新编译后,变成了$$invalidate()。
instance(component, options.props || {}, (i, ret, ...rest) => {
  const value = rest.length ? rest[0] : ret;
+ console.log('svelte instance $$invalidate', i, ret, rest);
  if ($$.ctx && not_equal($$.ctx[i], ($$.ctx[i] = value))) {
    if (!$$.skip_bound && $$.bound[i]) $$.bound[i](value);
    if (ready) make_dirty(component, i);
  }
  return ret;
})
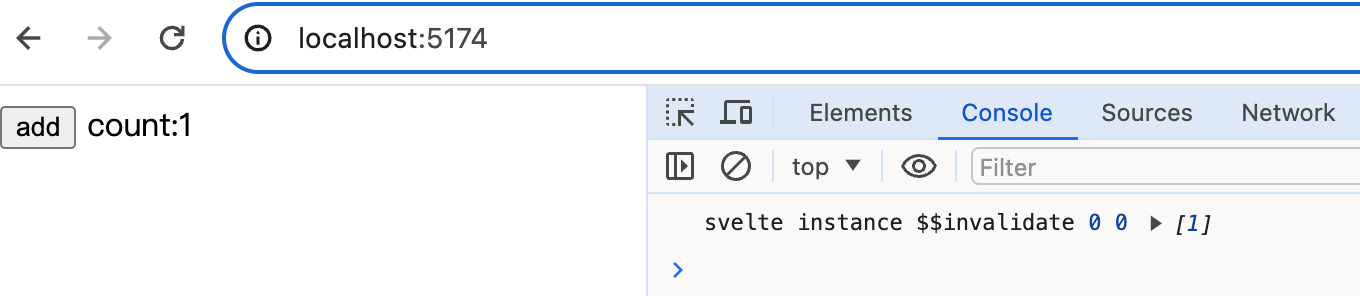 i是0,ret是未更新前的值0,rest数组中是更新后的值1。
经过
i是0,ret是未更新前的值0,rest数组中是更新后的值1。
经过not_equal比较后0和1不相等,触发make_dirty。
我们把剩余的关键节点都逐个打印出来
function make_dirty(component, i) {
+ console.log('svelte make_dirty', component, i);
  if (component.$$.dirty[0] === -1) {
    dirty_components.push(component);
    schedule_update();
    component.$$.dirty.fill(0);
+   console.log('svelte component.$$.dirty before', [...component.$$.dirty]);
  }
  component.$$.dirty[(i / 31) | 0] |= 1 << i % 31;
+ console.log('svelte component.$$.dirty after', component.$$.dirty);
}
export function schedule_update() {
+ console.log('svelte schedule_update');
  if (!update_scheduled) {
    update_scheduled = true;
    resolved_promise.then(flush);
  }
}
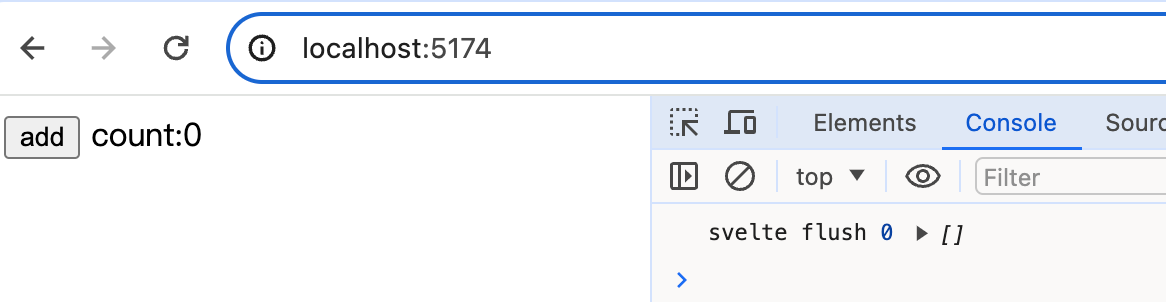
export function flush() {
+ console.log('svelte flush', flushidx, dirty_components);

  ...

  do {
    try {
      while (flushidx < dirty_components.length) {
        const component = dirty_components[flushidx];
        flushidx++;
        set_current_component(component);
        update(component.$$);
      }
    } catch (e) {
      ...
    }
  }
  ...
}
function update($$) {
+ console.log('svelte update');
  if ($$.fragment !== null) {
    $$.update();
    run_all($$.before_update);
    const dirty = $$.dirty;
    $$.dirty = [-1];
    $$.fragment && $$.fragment.p($$.ctx, dirty);
    $$.after_update.forEach(add_render_callback);
  }
}
p(ctx, [dirty]) {
+ console.log('svelte runtime p', ctx, dirty);
  if (dirty & /*count*/ 1) set_data(t2, /*count*/ ctx[0]);
},
当我们刷新页面时,执行了flush:
当我们点击button进行更新:

首先执行$$invalidate,然后执行make_dirty,然后执行schedule_update。
我们看到schedule_update内部其实就是把flush放到微任务中执行,所以我们会先看到component.$$.dirty在更新前的值是[0],然后执行位运算之后变成[1]。之后执行微任务中的flush,flush内部调用update,而update方法则是调用组件内的p方法。p方法中通过dirty & 1的判断1 & 1,从而执行set_data。
export function set_data(text, data) {
  data = '' + data;
  if (text.data === data) return;
  text.data = /** @type {string} */ (data);
}
set_data方法的主要逻辑则是更新text节点的data属性的值。
最后也提供一个简易的流程图:
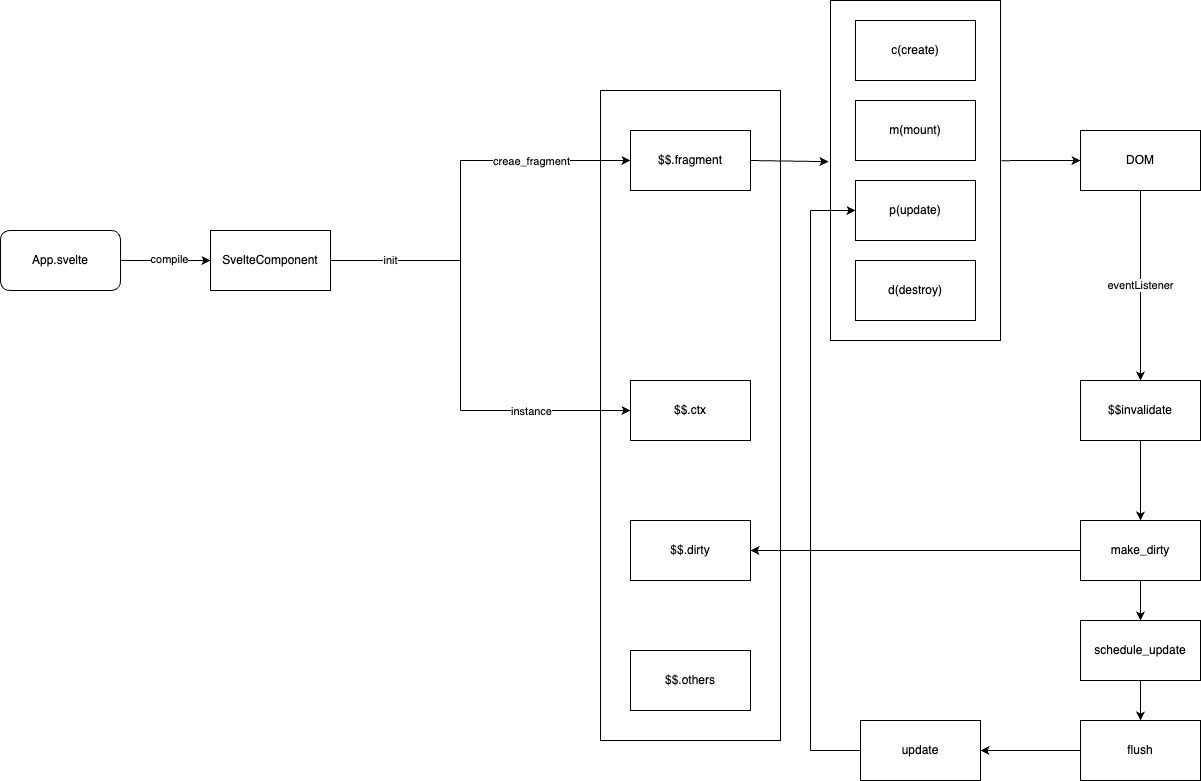
小结
本章我们学习了:
- compile的执行流程
- runtime的执行流程
compile和runtime的难易程度,基本符合二八定律,百分之八十的内容都在编译器如何解析Svelte文件上。